
One of the major trends in nail art right now – and one that I myself happen to love – is using materials other than nail polish to create unique, textured designs.
Over the months ahead, I’ll be writing a series of articles covering some of the practically endless nail art possibilities and showing you how to achieve them yourself. First, I want to start with one of the more straightforward options: loose glitter.
Related reading: 15 Beautiful Glitter Nail Designs You’ll Be Obsessing Over
Table of Contents
Techniques for Applying Nail Glitter:
There are two main techniques for applying nail glitter, and I’m going to demonstrate both. The first results in a nail that is completely sheathed in sparkle, and is perfect for special occasions or just a more daring statement. The second technique ends in glitter that’s more sparse, and creates a really cool effect when used over color for a more wearable, everyday look.
Here’s What You’ll Need:
- Base coat
- Nail polish
- Top coat
- Loose glitter
One quick note on the glitter: I used Sephora by OPI Nail Glitter for this tutorial, but I don’t see a reason why any other loose glitter wouldn’t work just as well (although the super sweet Sephora checkout girl did say she swears by this stuff and that it lasts forever). The Sephora glitter is also cheap, at just $5 a pot. But no matter what brand you choose, go with a fine glitter, so that it will adhere easily and lay flat on the nail.
Before you start, you may want to put something down on your work area – I used printer paper – so you can easily clean up the excess glitter and funnel it back into the pot. As with any manicure, remove any nail polish you’re currently wearing and wash your hands. Now it’s time for the fun part!
Technique #1: All-Over Glitter
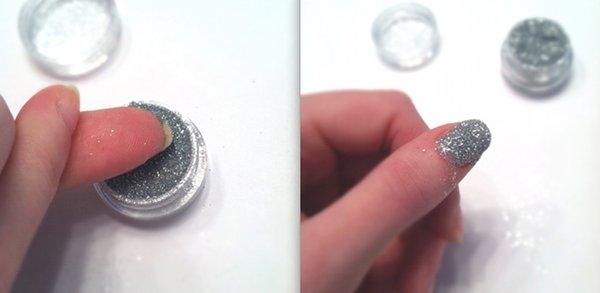
Step 1 — Apply a clear base coat. Make sure to apply it evenly so that the glitter will stick to the entire nail!
Step 2 — Dip your nail in the pot of glitter, laying it flat over the surface and rolling it back and forth a bit to cover the sides.
Step 3 — Tap your finger to remove any extra glitter. If you find that the glitter seems chunky or not completely even, you can press it on with your fingers.
Step 4 — As you can see in the picture of my nails above, glitter will probably get on your cuticles. Be sure to wipe it off so the finished product looks precise. I found that an eyeshadow brush is perfect for this, because it dusts all the glitter off without getting it on the fingers of your other hand or messing up your nails.
Technique #2: A Sprinkle of Glitter
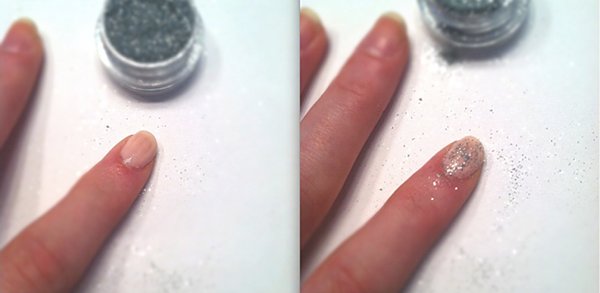
Step 1 — Apply a clear base coat and color, as you would with a normal manicure. I used a very pale pink, but colors that are darker or more vibrant would also look awesome.
Step 2 — While the polish is still wet, take a pinch of glitter with your other hand and sprinkle it over the nail.
Step 3 — Tap off the excess and wipe your cuticles clean.
Step 4 — Make sure the nails on one hand are completely dry before doing nails on the other hand. If they’re still wet, they will pick up more glitter than you intended to put on them when you go to sprinkle your other nails, and they may start to look messy.
Finishing Up
Repeat these steps on the rest of your nails. Or don’t, and have just a few nails that glimmer. The choice is yours!
After applying glitter, I would recommend at least two top coats to ensure that you get a really good seal and a smooth texture. I used three or four – I like my nails glossy! Be sure to do this gently in order to avoid wiping off chunks of glitter as you go.
After trying these two methods, I decided to give some fun designs like these a go:
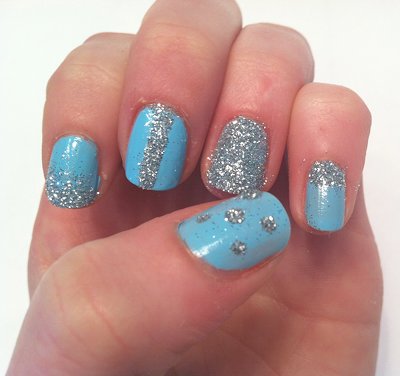
To make the polka dots, I just dabbed little dots of top coat onto my nail and pressed my nail into the glitter. I then used my eyeshadow brush to clean up extra glitter between the dots.
The other patterns were a little easier – for the stripe on my middle finger, I put scotch tape on either side of my nail, leaving a gap between the two pieces where I put on some top coat. Then I dipped my nail in the glitter as I normally would and gently peeled off the tape to reveal a clean stripe. On my index and pinkie fingers, I just put the top coat on half the nail and then used my brush to get the glitter where I wanted it to go.
Also Read : DIY Beauty: Glitter Nail Polish
Your thoughts?
Would you try out ultra-sparkly nails? How would you wear them? Have you come up with any cool glitter designs of your own? Leave your ideas and questions in the comments section below.
For more glitter nails tips and ideas, check out our related posts below –
I really like this DIY. I just found a Sally Hansen glitter polish but I think it’s not glittery enough. I really like the coral-y color at the top and the blue nail. I think I might find some colors like that and do this! 🙂 Thank you for the d.i.y.!
I love the sparkles at either end of the finger nail. It’s like a glitter ombre! I especially love Essie’s Tart Deco. It would go with gold glitter just as well!
I recently got obsessed with this trend. I don’t usally like glittery nails but I love silver glitter over black nailpolish, perfect for a going out look 🙂
Rae – the nail polish in the first picture is Essie Tart Deco. Here’s the URL for the original article from Cupcakes and Cashmere: http://cupcakesandcashmere.com/?s=apricot+nails
Cute look, but I just do not have the patience to wait while one hand completely dries, then do the other hand, then apply and wait for two or three topcoats to dry – especially for it all to stay on for only a couple of days. I’d maybe try this for a special event on a weekend, but that’s the limit of my patience for something this finicky and complicated. I know with glitter polish, the removal bites, but all told it seems like this would take even more time. Great look, but not for me.
i really want to know the name of the brand and colour of the nail polish in the top picture
This is such a good tutorial! I’ve actually been curious about how to apply glitter. Now I feel stupid that I spent $10 on glittery nail polish. Oh well. So purrty!
Beth – what you said about getting glitter from a craft store is completely true. Like I said in the article, any type of fine, loose glitter should work splendidly! I also realized that your concern about glitter in the pot getting gunked up might be a concern other readers had as well, so I just wanted to address that by saying dipping your nails shouldn’t mess up the rest of the glitter, because everything that touches the polish will adhere to it, so no polish or chunks of glitter will be left behind, if that makes sense. Hope this clarifies things!
Also- a tip I learned to do just the French tip like your index finger is to paint your nails, and while they’re still wet, dip a fan brush ($2 at Michael’s,) into the pot of glitter and lightly roll it over the tips of your nails. Mizzchevious on YouTube does a great tutorial.
And yes, it comes off with regular polish remover, but I highly recommend the 100% acetone kind or you will be scrubbing for hours with the cotton pad- you can also use felt if you’d like- it holds up better for removing glitter and glitter polish.
where would you purchase 100% acetone nail remover nail polish remover if you don’t mind my asking and thank you in advance for your help
You can get it here on Amazon! https://amzn.to/37NLmq5 Hope that helps.
Thanks for the comments, guys! Emma, to answer your question, it does. I had no problems taking it off with nail polish remover. I would even say it was easier to take off than my glitter polish. 🙂
I love glitter HOWEVER- $5 for that tiny pot of sephora glitter is insane. You can go to Michaels, JoAnne’s or AC Moore and get a full 1.5 ounces of extra fine glitter for under $5. And they have a huge selection. With that much glitter you can bedazzle an entire pair of shoes and still have more than that sephora pot leftover to do your nails- just a friendly heads-up 🙂 plus, it comes with a sprinkle top so you don’t have to roll your nails in it and risk gunking up the glitter still in the pot.
Will the glitter come off with regular nail polish remover?
I do this, but I only put glitter on one finger. It’s a pretty accent with black nail polish
I would so wear glitter nail polish! I saw that on Cupcakes and Cashmere and fell in love, great post!
I especially like the pattern of glitter on your index finger! I think if I were going to do the one on the ring finger though that I would just use several coats of a glitter nail polish instead. Still a helpful post!
You could also use a loose eyeshadows for this technique!