
With nail art being an ever-growing trend, it seems like everyone is trying their hand at creating intricate fingertip designs. (Here at CF, we even have a Nailspiration Pinterest board to keep track of our favorite nail art looks!)
However, if you’re not exactly steady-handed or skilled with a detail brush, glitter polish can offer a super easy way to create a fantastic nail art look in a flash. Below, we’ll share our four favorite ways to use glitter for simple nail art.
Related reading: 15 Beautiful Glitter Nail Designs You’ll Be Obsessing Over
Table of Contents
Before We Begin, a Word on Glitter Polishes:
In my experience, I’ve found that most glitter polishes work best against a dark base color (pretty obvious, right?), but the beauty of the glitter polish is that you can use any shade you want to create lighter, more ethereal looks, or darker, moodier aesthetics.
The most popular glitter polishes out there right now are Deborah Lippman’s Glitter Polish and the Sephora by OPI Jewelry Top Coats, but for girls on a budget, I recommend hitting your local drugstore for Sally Hansen Xtreme Wear, NYC or Wet N’ Wild polishes.
Also, make sure to use a good top coat to seal your polish once you’re done!
1. A Glitter Statement or Accent Nail
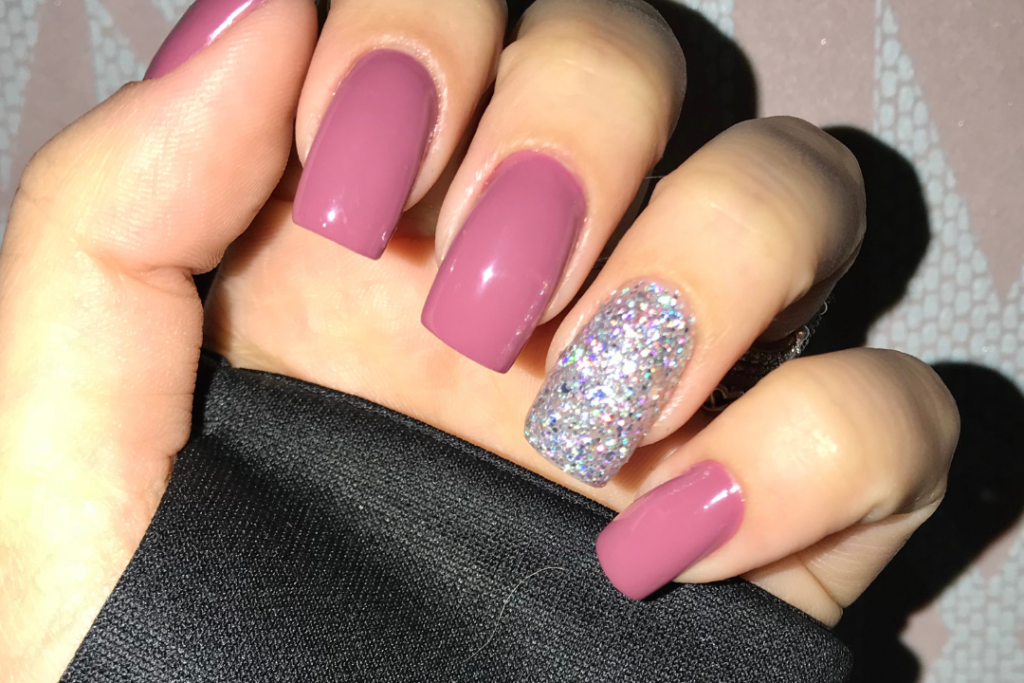
Just by painting glitter over one of your nails (I find that chunky glitter polishes give a better effect), you can create an interesting, yet sophisticated design without overloading on the glitter.
Personally, I use the Sephora by OPI glitter polishes for this, as they combine both chunky and fine glitters into one bottle.
2. Glitter-Tipped Nails
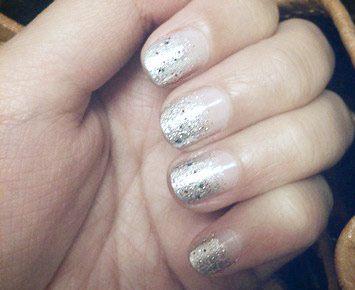
This look is super easy and really impressive once you’re done! You can either layer on a base coat of polish before using the glitter, or do the gradient effect with bare nails – it’s up to you.
Above, I did a gradient effect on top of a nude polish. To do this, apply your base color first and let dry. Then, take your glitter polish and apply a thin layer to the tip of your nail, starting your brush about halfway up the nail. Then add more layers of glitter, each time starting your brush closer to the tip of your nail. If your glitter polish is not dense enough to build up, you can always apply in a thin layer of sheer polish in between layers to get the effect you want (as I did in the photo above).
3. Glitter French Manicure
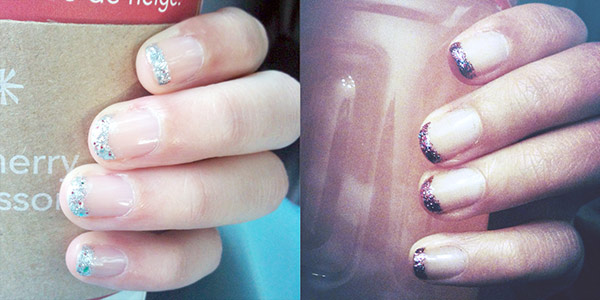
For this, I find that finer glitter works the best, such as Sally Hansen Xtreme Wear in Rockstar Pink or Strobe Light (as seen in the photo).
This design is essentially a french manicure, but it uses glitter for the tips instead. The beauty of this is that you can usually skip a base color or use any color of your choice, plus you don’t need to worry much about making mistakes as the base of the glitter polish is transparent. I’d recommend using finer glitter for this, or if you choose to put on a layer of chunky glitter, I find that dotting on some polish and dragging it along the tip works quite well.
4. Glitter Fade Nails
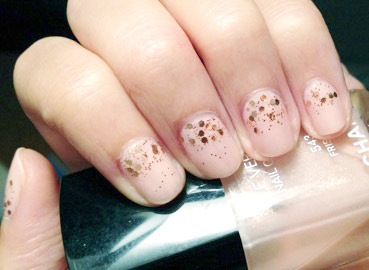
For this design, I used Sephora by OPI’s Traffic Stopper Copper, but any sort of glitter polish that has a mix of chunky and fine glitter would do.
This is glitter tip nails in reverse – instead of fading the glitter from the tip down, you fade from the bottom up.
For this design, I don’t worry as much about the ‘fading’ and, instead, I concentrate more on applying the right amount of glitter. (Less is more here!) To do this, I suggest simply applying the glitter in a half moon shape at the base of your nail. You will get the visual gradient effect so long as you don’t use a super thick glitter.
Extra Tip: How to Easily Remove Glitter Polish:
If you are turned off by glitter polish because it can be hard to remove, follow these steps to get the glitter off in less than five minutes:
- Soak a small cotton ball in your nail polish remover. (You will need one soaked cotton ball per nail.)
- Place the soaked cotton ball over your nail, making sure it covers the glitter.
- Wrap a piece of aluminum foil over each finger tip and wait for at least three minutes.
- Unwrap the foil and slide the cotton off. The glitter, along with your base polish, will come right off.
Your thoughts?
I hope these easy ideas got you inspired to try out glitter polish as nail art! Overall, the same concept applies to all these designs and paves the way for you to experiment with other glitter designs, such as layering chunky glitter over fine and/or experimenting with different colors and shapes.
Now I want to hear from you – what are your favorite glitter polishes? How do you use glitter in your nail art? Which of these looks is your favorite? Let me know in the comments section below!