
In my last post, I received a comment about how some people may not know why certain steps are required, such as adding in a transition shade to an eye makeup look. That sparked an idea for me to create a basic eyeshadow look and go over the directions step-by-step.
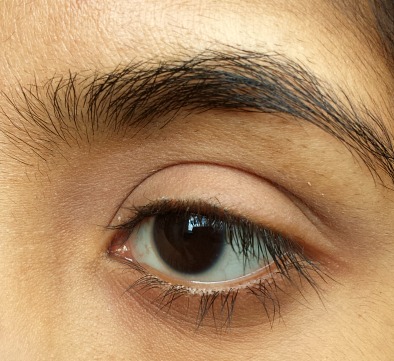
A basic eyeshadow look consists of a light color, a middle color, and a dark color. If you’re a beginner when it comes to makeup, this is a perfect look for you. Read on to learn how to recreate the beauty look shown above.
Table of Contents
What You’ll Need:
- I highly recommend getting a fluffy blending brush. Something reminiscent of a MAC 217 will do. You just need a brush that is tapered outwards and is fluffy and not dense to blend out your shades.
- I will be using the Base Shadow Brush from the Real Techniques Starter Kit, which has the fluffy, MAC 217 look to it. You can find Real Techniques at various locations such as Walmart, Ulta or even Kohl’s.
- I’ll be using the LORAC Pro Palette. I really love this palette and recommend purchasing it if you want to invest in a nice neutral palette. A drugstore alternative is Maybelline’s The Nudes Palette. I personally haven’t tried it, but if you’re on a budget it’s worth looking into. You can read more about both palettes in this CF post. Also, if you want to get more advanced and use single shadows, see our guide to the best single eyeshadow shades.
Let’s Begin!
Step 1:
Start by priming your eyes with a eyeshadow primer. An eyeshadow primer is used prior to applying eyeshadow. Its purpose is to allow your eyeshadows to stick better, which increases its longevity. Primer also helps to intensify your shadow and allows it show more true to what’s in the palette or pan.
I’m using the cult favorite Urban Decay Primer Potion. If you’re just starting out with makeup or are on a budget, e.l.f. makes an excellent $3 one.
Step 2:
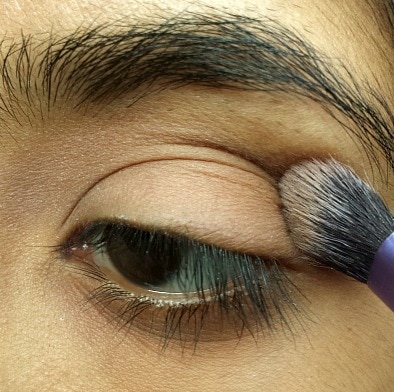
Next, take an eyeshadow that is about a shade or two darker than your own skintone and run it back and forth onto your crease. I am using the shade “Taupe” from the Pro Palette. This will be our transition shade.
A transition shade is something that helps to merge colors together, and also gives some depth to your eyeshadow. Even if you decide to only use one eyeshadow on your lid, a transition shade will help bring it to another level, and give it an intensity that otherwise wouldn’t be there. The reason you need a shade or two darker is because it acts as “the middle man,” and brings the darker shade and the lightest shade together.
If you’re wondering what your crease is, it’s the space between where your eyelids fold and where your browbone begins. Use a fluffy brush to sweep the eyeshadow back and forth onto the crease. This is a method that a lot of people call the “windshield wiper” method, because the motion is reminiscent of, you guessed it, how a windshield wiper works.
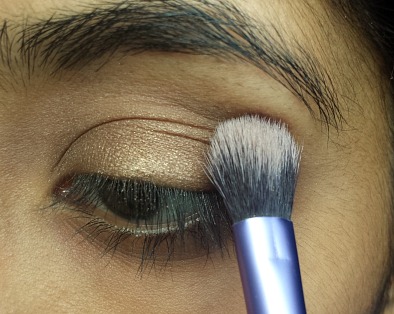
Step 3:
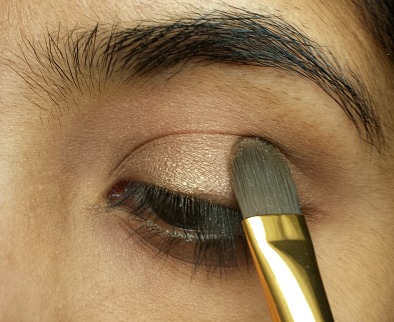
After adding the transition color, it’s time to apply our lid shade. Typically, I go for a light, shimmery eyeshadow. You can also use a medium color if you want to make the look darker and smokier.
The brush I’m using is not a typical eyeshadow brush. It is actually a concealer brush that came in a kit that I bought several years back. I prefer to use a flat concealer brush to apply eyeshadow because I find it picks up more product and is more precise. However, you do not need to use this style of brush – e.l.f. makes a wonderful eyeshadow brush that is only $1. I find that it works well and does the job.
Take your lid color and pat it onto your lid. You want to pat it so excess eyeshadow doesn’t fall onto your face (also known as fallout). You can sweep the eyeshadow if you want more intensity. I recommend stopping the lid color where your eyelid folds (aka where your crease begins). That way, the color doesn’t go too far up, and it won’t end up looking too shimmery or washed out.
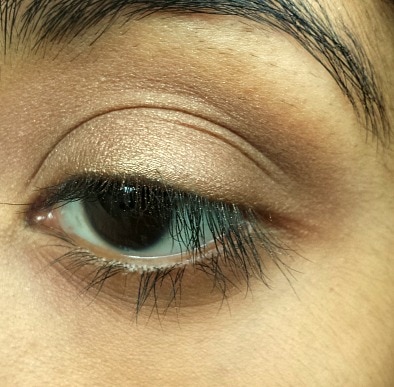
How it should look:
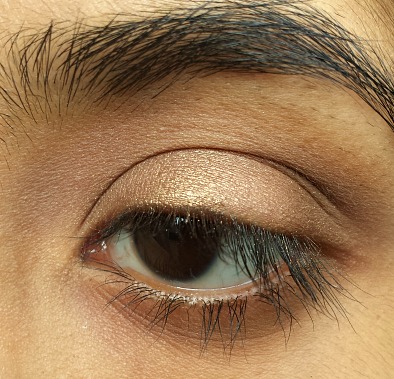
This is what your eye makeup should look like at this stage. As you can see, I kept the lid shade on the lid.
Step 4:
Whip out that fluffy brush again, because now we need to blend the shades together. It’s important to blend because if you don’t, there will be a prominent line of eyeshadow when you look down or close your eyes. Blend it using the windshield wiper technique we talked about earlier.
How it should look:
Again, this is what your eyeshadow should look like at this point.
Step 5:
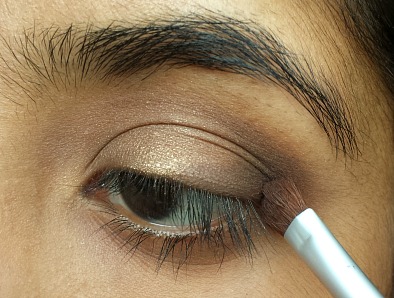
Take your darkest color – which in this case is a mixture of “Sable” and “Espresso” from the Pro Palette – and place the shade on the outer “v “of your eye with a small eyeshadow brush or an angled brush, like this one from e.l.f.
If you don’t know where your outer “v” is, just place your brush near the end of your lashline, then sweep to the side (to the left for your right eye and to the right for your left eye). Take the brush back to the end of the lashline and go slightly up and into your crease.
After you’ve placed your shadow, make sure to take your fluffy brush and blend out the edges so it doesn’t look harsh.
Finishing Touches:
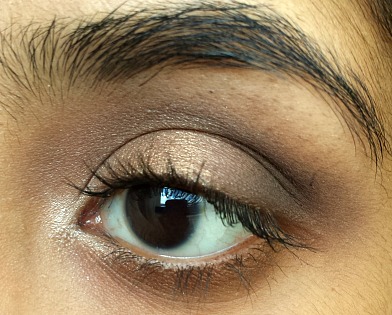
This is the finished eye. I added some of that dark shadow onto my lower lashes, then added a light, shimmery shade to the inner corner. Both are optional.
If you are going to to use a dark shadow underneath, take that fluffy brush (see I told you it’d come in handy) and brush out the eyeshadow. You don’t want there to be a stark line underneath your lashes and doubling up as a dark circle.
The Finished Look:
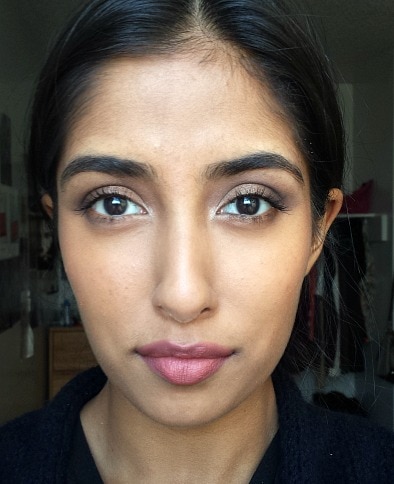
Here’s a zoomed-out pic of the finished look! I paired the eye makeup with a pink-brown lip for a subtle, everyday look, but feel free to choose whatever lip color you want or even opt out of one.
Tips & Tricks for Recreating this Look:
- Feel free to go back and add more of your lid shade if you felt like you lost some of the intensity.
- If you want your lid shade to really pop and it is a shimmery shade, take a brush, lightly dampen it, then dip back into your lid shade and pat on the color. You should get an intense color.
- If you’re just learning how to use makeup, I recommend sticking with neutral eyeshadows, then working your way to colorful ones.
What do you think?
I hope you enjoyed this tutorial and found it helpful! If you have any questions about certain products, or if you need more explanation, please let me know and I’ll do my best to help you out.
What are your favorite eyeshadow palettes? What is your everyday basic eye makeup look? Let me know in the comments below!
Best simple tutorial ever. Watched dozens on you tube and this is the best. And it works! Thanks a million!
I know this was posted a while ago; regardless, it’s still one of the most useful eye makeup tutorials I have come across. Thank you! 🙂 xx