Whether you’re a do-it-yourself guru or are just looking to dress up your wardrobe without breaking the bank, College Fashion’s DIY Chic is here to show you how on a college budget. If you’re looking for more DIY inspiration, take a look at our past tutorials on creating your own flower hair clip, a quote print scarf, or a pair of button stub earrings, skinny-fying your flare jeans, or adding a twist to a vintage item.
For me, there is nothing more sweet and feminine than a bow. Kathrine from Make It + Fake It added them to her favorite pumps, they are a favorite detail on blouses and tops, and this week’s DIY Chic turns them into a simple hair accessory.
The following DIY bow hair clip is a great way to add a feminine detail to your look or perk up a less-than-perfect hair day. Take a look at the simple step-by-step project and learn how to make your own:
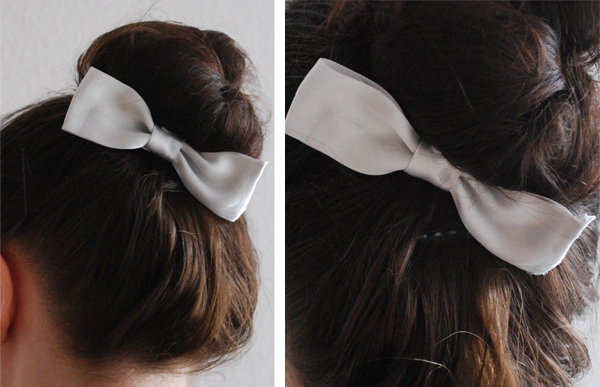
Table of Contents
What you’ll need:
- Ribbon or fabric – The amount depends on the size of the bow you want to create. I’d recommend at least 12 inches.
- Alligator clip – You can pick these up at any craft store.
- Hot glue gun
- Scissors
The step-by-step process:
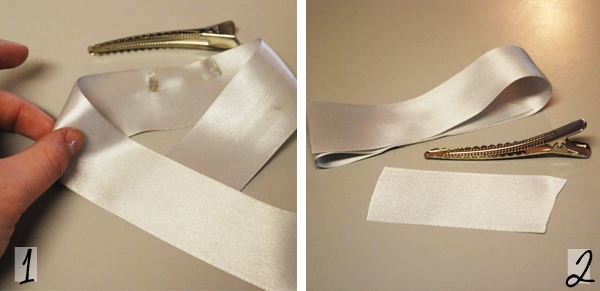
1. First, start by measuring out how large you want your bow to be. It should be long enough to cover your clip. You can estimate this by doubling over the ribbon or fabric that will form the loops and body of the bow, as shown below.
2. Cut your ribbon or fabric accordingly. Then cut a slightly smaller piece, at least 2 inches long, that will later be the center of your bow. Save any extra ribbon to construct the back of the hair piece later, if needed.
3. Double over your long strip of fabric as shown in image 2, above, and pinch the center to form your loops. Wrap the small piece of ribbon or fabric around the the center of your bow (as seen in 3, below) and secure with a dab of glue. You now have the start of your hair piece.
4. Depending on your fabric choice, it might be necessary to cut one more piece of ribbon or fabric to fit the clip and back of your bow. If so, just clip the alligator clip to this piece. Then carefully apply glue to the underside of the piece and press it onto the bow.
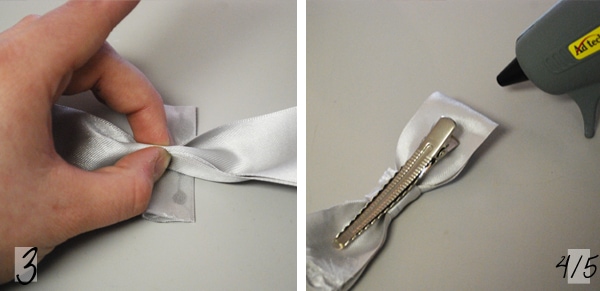
5. Or, if your fabric allows, can glue the alligator clip directly to the back of the bow like I did. Let the glue dry and cool for a minute or two and you’re done!
And there you have it! Just like the flower hair clip tutorial we shared a few weeks back, this is another simple and quick hair accessory to carry you into the spring season. Feel free to get creative with your ribbon or fabric colors: Lace fabrics, neon colors, or floral ribbons would be fab for spring!
What do you think?
What do you think of this simple and sweet hair accessory? Would you try adding a bow detail to your daily look? Do you have a do-it-yourself project you’d like to see on College Fashion in the future? Let us know in a comment!
So cute!! I love DIYing accessories 🙂
I’m just wondering, how long did you make your fabric for the bow part? Or how long would you suggest? Measurements, please. 🙂
Brittany, so glad to hear that you enjoyed it! It’s definitely a cheap and easy project. Best of luck!
Wow! Thank you for these. It seems simple enough, but I never would have thought of this. You saved me from spending a fortune on hair accessories for an upcoming Spring party!
This is a really cool post, and I really want you to do a Lying Games fashion inspiration series. There’s a lot of cool and original outfits please!