
One of the cornerstones of fashion school is learning how to sketch fashion figures. However, as fashion school students learn, there’s a big difference between proper body proportions in art and in fashion.
In art, the body’s proportions are measured in heads. The average figure is about 7-7 1/2 heads, including the actual head, tall.
However, in fashion, the body proportions are elongated in order to better represent the models, who are above average in height. Because of this, the figures become 8-10 heads tall. Though the basic proportions of the fashion figure are about the same — give or take 1/4-1/2 of a head — every illustrator adds their own style to the formula.
If you want to embrace your inner fashion designer, or just want to learn more about what fashion school is like, read on!
Today, I’ll teach you how to sketch a proportionate female fashion figure and how to translate the measurements into a walking pose. Scroll down to learn more:
Table of Contents
Why Are Fashion Drawings Important?
Fashion illustration are a key part of a fashion designer’s process for communicating design elements like fit and length of clothing. Fashion sketches can also serve as a mood board for fashion shows, illustrating how designers would want their clothing to look and fit on the models. The use cases don’t stop there though; designers might find themselves using sketches for conveying their own personal flair through different poses or backgrounds. Also, fashion illustration can be a form of art in its own right; fashion illustrators often sell their work as prints these days.
Materials You’ll Need:
- Pencil
- Eraser
- Ruler (if you want to be extremely precise)
- A sketchpad (duh!)
Fashion Sketching 101: How to Draw a Female Fashion Figure
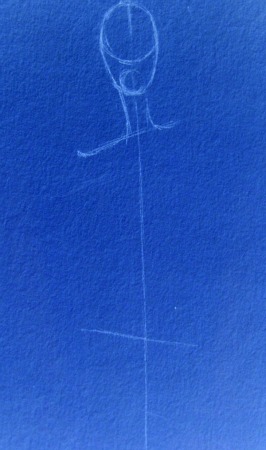
Step #1. Create a Balance Line
Draw a line. This is the balance line, a.k.a. the line which determines the body’s center of gravity. The balance line always extends from the base of the neck (where it meets the shoulders) straight to the ground.
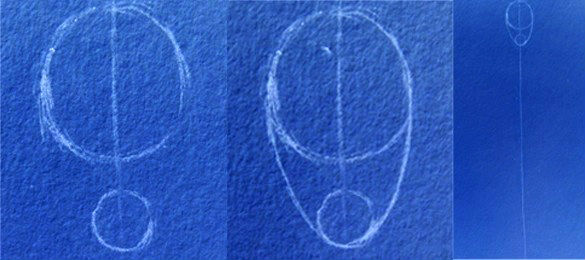
Step #2. Draw the Head
Draw a head with the middle of it on the line. To draw a head, sketch a large circle on top with a smaller circle below it. Connect these two on the sides with slightly rounded diagonal lines, as shown in the sketch below.
Step #3. Measure the Head
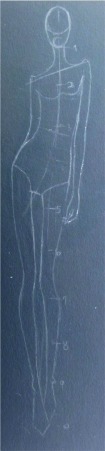
Measure the head, either with your pencil or the ruler. Using this measurement, draw nine small dashes equal distance apart, then number them from the bottom of the chin (#1) down to the bottom of the feet (#10).
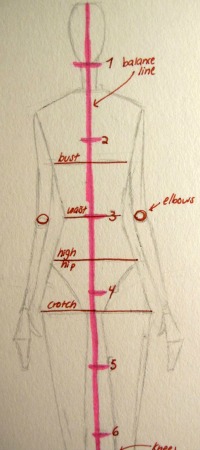
Step #4. Draw a Line (For Shoulders, bust, waist, high hip, and crotch)
For the top half of the body, draw lines extending from 1 1/2 heads, 2 1/4, 3, 3 1/2, and 4 1/4 heads, as outlined below. These marks are where the shoulders, bust, waist, high hip, and crotch are located, respectively. The elbows are also located with the waist at the 3 heads mark.
Step #5. Create Lines for Knees & Ankles
Draw the features in, using straight lines: The shoulders on the woman fashion figure are 1 1/2 heads wide, the waist is a head’s width, while the hips should be about 1 1/4 heads wide. Therefore, the woman fashion figure should have an hourglass silhouette.
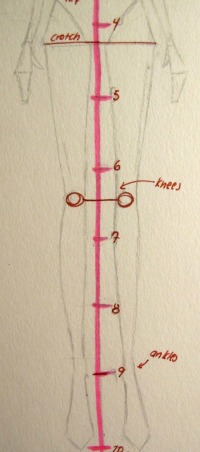
Step #6. Draw the Legs
For the lower half of the body, mark 6 1/2 heads as well as 9 for the knees and ankles, respectively.
Step #7. Finalize the Feet
Draw the legs by making lines that curve and narrow as they go from the high hip to the knee for the thighs. For the calves, make a smaller cylindrical shape by curving the lines from the knees and then tapering them at the ankles, which jut out slightly on the inner half of each leg.
The thighs (from high hip to knee) and the calves (from knee to ankle) should be the same length.
Step #8. Draw the head for the feet
The last head is for the feet, which begin at the ankle to flare out in diagonal lines for 3/4 of the length of the head before they meet at a point.
Step #9. Draw the Hands
Draw the hands similarly. These begin with the wrist at the crotch. The fingers should end a little above the 5 heads mark.
Fashion Sketching 102: How to Draw Figure Movement
Once you get the proportions down, now it’s time to give the figure movement! There are three crucial components which all fashion figures require: a balance line, a high shoulder, and an opposing high hip.
Start by sketching a new figure. However, this time (after drawing the balance line and putting down the 10 head marks) tilt the shoulder line so that one side is higher. Tilt the high hip, too, but with the opposite side higher.
For example below, I made the right shoulder higher so the left hip would be higher in order to keep the figure balanced. Try it yourself: If you tilt your shoulders, what happens to your hips?
Additionally, by tilting parts of the body, the rest of the body will follow suit. Anything above the high hip will follow the tilt of the shoulders, while everything below will follow the tilt of the hips, however all of these tilts will not be as severe as the shoulders and hips.
There’s one more rule that fashion figures must follow: the leg which comes from the high hip cannot be bent and that foot must touch the balance line. This keeps the figure balanced. Again, you can try this by shifting your weight to one foot . When this happens, the leg supporting all the weight cannot be bent.
Example of a walking pose:
Notice the tilts including the subtle differences between the two knees.
Now you can have fun and try drawing your own fashion figures!
To start, find poses to mimic by looking through magazines. To copy the pose, just remember to identify the balance line, the high shoulder, high hip, and the supporting leg (the one which touches the balance line).
What do you think?
Did you know about fashion proportions? Have you heard about measuring the body using heads? Did you find this tutorial helpful? Would you like to learn how to draw some basic poses? Tell me what you think by leaving a comment!
Related posts:
I found this so helpful! I have had many different methods in the past and they all worked wrong. Thank you! I also would like to know if this also applies to plus size designs? if not, could you maybe make one? 🙂
Draw Dress
Fashion designing is my top hobby. From a very little age I always drew something which is related to fashion. I tried to take lessons from a professional but could not able to find one to guide me. This article has some amazing lessons. Making the head is so easy I never knew that. Following this steps can make anyone create an female image within a minute. Thanks for the amazing lessons.
Thank you so much I use the your drawing tips in mine https://www.sarvinstyle.com/fashion-figure/
l ask my boss to teach me this And he never did and now I know. God bless u very much.
but plesse, I want to know about the poses in dress. thank u.
its really gret i loved it a lot n it was very helpful..:-)
Great