As a girl who will smear even the quickest-drying nail polish before it sets and chip it right after that, I’m always testing new nail polishes that promise quick-drying and long-lasting wear.
So, I was very excited to learn about the new Sally Hansen Salon Effects Real Nail Polish Strips. These aren’t the like the nail stickers of childhood, i.e. stick-ons of flowers or stars. Sally Hansen strips are made with real nail polish and are supposed to look like they were painted onto your nails.
Also read: How to Make DIY Nail Stickers
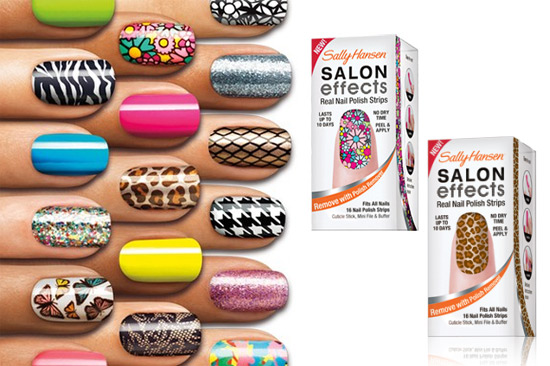
The nail strips come in 24 different styles ranging from bright solids like orange and yellow to a multitude of patterns, including animal prints, glitters, camo, and denim. I chose the Collide-o-Scope pattern, a bright rainbow of colors in a funky print. Want to see what I thought of them? Read on for my experience with the Sally Hansen Real Nail Polish Strips.
Table of Contents
Sally Hansen Real Nail Polish Strips Application Process
Step 1: Prep
The kit, as pictured above the top, includes 16 nail polish strips, a mini nail file/buffer, and a cuticle stick. It also includes basic, illustrated instructions. First, it’s necessary to prep your nails for application which includes pushing back cuticles, shaping the nails with the file, and smoothing the nail surface with the buffer. The instructions also suggest giving your nails a final swipe of polish remover to clean off any remaining polish or residue.
Step 2: Apply The Polish Strips
After prepping my nails, I was ready to begin applying the polish strips. The instructions included in the kit explain the process very well, so the application wasn’t too challenging. When I first counted the 16 strips included with the kit I was confused, but I soon learned the extra strips include a wide variety of sizes to fit everyone’s nails. I had no problem finding correctly sized strips for my nails.
To apply, all you need to do is remove the two covers from each side of the strip. The ends of each strip have different shapes, so it’s easy to match them to your natural nail shape.
Then, attach the strip below your cuticle and lightly (and I mean very lightly) stretch the polish strip over your nail. I actually tore one strip from stretching it too hard over my nail – another reason the extra polish strips are useful! You then use the cuticle stick to press each polish strip down onto the nail.
Also read: DIY Nail Art Tutorial: Loose Glitter
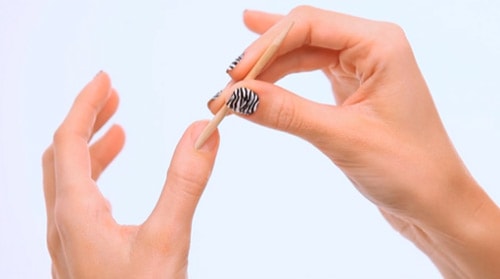
Step 3: Shape The Polish Strips
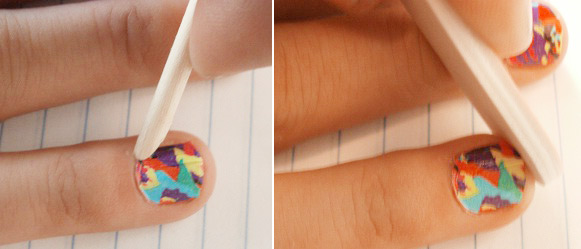
I found it best to use my fingers to push the polish strips down around the tip of my nail, then use the nail file to tear off the excess gently.
Overall, the application was a breeze, which impressed me, considering I’m not the most dexterous person. From start to finish, the entire application process took around 30 minutes.
Although the package directions do not mention adding a topcoat, upon reading reviews on the Sally Hansen website, I did apply a clear topcoat over the strips because so many others mentioned this made the strips last much longer. This made my application take a little bit more time.
Final Advice + Review:
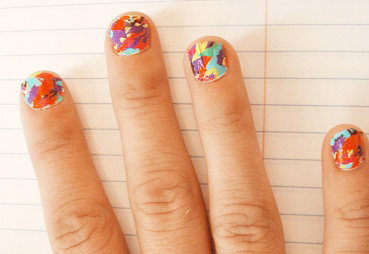
The Sally Hansen Salon Effects Real Nail Polish Strips kit does live up to its claims. The strips were relatively simple to apply and obviously needed no “drying” time. In addition, the patterns are beautiful and are so much more graphic than anything you could achieve using nail polish from a bottle.
However, the SH Nail Polish Strips did fall short when it came to long-lasting wear. The product claims it can last up to 10 days chip-free, but I ended up removing mine within seven days. I will say, though, that thanks to my part-time job as a server, my nails do go through more than your average wear and tear. So at around $10 per kit, these nail strips could be expensive to maintain.
I rate the Sally Hansen Salon Effects Nail Polish Strips a 3 out of 5.
Overall, the SH Nail Polish Strips are a great way to achieve gorgeous, unique nails without much effort. Even though I don’t think they are particularly cost-effective since they aren’t so long-lasting, I still adore all of the amazing prints and patterns available. They would be great for a special occasion when you want to do a little something “extra,” but probably aren’t practical for weekly wear.
Your Thoughts?
Have you ever tried the Sally Hansen Nail Polish Strips? What were your results, and do you have any application tips to share? Do you think the nail polish strips are worth $10? Are there any nail trends you are dying to try out? Be sure to leave a comment and let me know!
If you love these nail polish strips from Sally Hansen, you can check out some of the related posts below —
I’ve been using the nail stripes and design you can pick. Usually about 2 to 3 WK wear.
I use these strips on my toenails because I have a hard time painting my toenails and not making a mess. I have to remove them because they grow out…that’s how long they stay on my toes! I love the solid colors, especially the red. I’ve been using these for years and would highly recommend to anyone.
I love these nail polish strips! I also use a gel top coat and they last up to 3 weeks for me. I found a new company that sells them and has a lot of cute styles https://nailcolorstrips.com
I bought mine at five below for 3 for $5. I end up using one box for two applications to save money. They can be a bit hard to put on if you are like me and your nail beds are a bit strange. Either way they are fun but I wont be using them all the time since they can get expensive and take time for me. I like painting my polish on personally and I love my colors so I will still be using them. My number one complaint is the price. They are way too expensive for what they are depending on where you get them. Even at Walmart they are $8. I will use them on special occasions but that is it.
SH-LOVE them! Easy easy & quick application. I buy in bulk when on sale. I get sooo many compliments on them! Adding SH top coat gives me 9-10 days. Jamberry are horrible. Difficult & time consuming application & they start peeling @ tips. Also too expensive. Will always use SH products
I’ve been using these for years. I swear by them. Here’s some tips for those of you who haven’t regularly used them:
1. ALWAYS swipe your nail with polish remover before applying nail strip. This takes the natural oil from your skin off of your nail & keeps the strips on longer.
2. Only buy the printed strips. The plain ones with no designs tend to always chip.
3. Do not apply a top coat! Despite what others have said or recommended, this is not only unnecessary, but won’t keep the integrity of the nail strip. It will actually make it not last as long.
4. Practice! These guys are easy! Be gentle! Read & follow exact directions.
5. There are limited edition nail strips available for around $5. They come without the file & cuticle stick & a few less strips, but for someone like me who uses these frequently I didn’t need or want to waste the extras. They come in a flat package instead of the box. The nail strips are exactly the same.
6. You can’t reuse these! Once these are open from their air sealed package, that’s it. Use them right away & throw away the rest. They are real nail polish & will dry up within hours of air exposure.
7. Have warm hands when applying. If you’re cold & your hands are not warm, the nail strips will harden & be harder to apply. When your fingers are warm they warm up & soften the strip & makes them more pliable.
8. Have a little bit of nail growth! These look & work best when your nails have a little over-hang. The excess is much easier to file off & looks more suffice.
9. Get rid of those cuticles! Cuticles are the nail strips’ enemy! Make sure they are gone or pushed way back & don’t let the strip her on anything other than the nail or it will not stick.
10. Avoid getting fingers on the syrup that’s going to be applied to the nail. Unless you have really long nails, there should be enough room for you to avoid touching the main part of the strip.
They can be set with a hairdrier. Blow the hairdryer at the nail polish strips for about 5 seconds. It will melt the sticker a little bit and it helps to stick your strips better, which is equal to a longer mani. 🙂
I’ve wanted to try these! But the price, and the fact that I always get bored with my manicures after a few days, kept me away. Maybe for a special occasion though!
I’ve used these several times before and I like them a lot. I just don’t buy them too often because I can’t stand having the same nail color for too long so I usually end up taking them off after a few days.
Hmm, $10 seems expensive for just one set. I’d rather invest in some nail art pens and make as many designs as I liked. It wouldn’t be as quick but it would be fun all the same!
Aryn
Driftwood and Daydreams
I’ve tried these and they lasted a long time for me because I put top coat over them. I actually ended up getting sick of them after a while and the hard part was getting them off of my nails.
When I tried the sally hansen nails stickers, I was greatly disappointed. When I was putting them on, within minutes 3 fell off. After two days, all of them had fallen off. I wouldn’t buy these again
I find that adding a top coat to the nail polish tabs makes them peel and chop off faster, depending on how thick the tabs are. Also, if you still want to use a top coat, use a vinyl one and make sure that you wrap it under the edge of your nails. I have been using these tabs for years. I love polish, but it never fails, that somehow I mess them up. So this has been a godsend for me. Blessings.
I adore Jamberry wraps/strips.
http://570.jamberry.com
Can they be set with a hair dryer instead of buying their dryer
Can the nails be set with a hair dryer instead of buying their dryer?