
Last week we talked about the best places to buy bedding. While doing the research for that post, I realized that at most stores, pillows are expensive.
Don’t get me wrong: I love my boho-inspired and catchy phrase throw pillows as much as the next girl. I’m just not sure I’m willing to spend more than $15 on a pillow.
If you want some cute pillows for your bed without spending a lot, or you have some old pillows that could use a makeover, I’ve compiled a list of DIY pillow tutorials below. (I’ve organized them by the level of difficulty and how time-consuming they seem.)
Want to make sure you have the cutest bed on campus? Try these easy DIY bed pillow projects:
Table of Contents
Beginner DIY Pillows
1. Iron-on transfers
This wouldn’t be a DIY bed pillow compilation without at least one transfer paper project.

I have used transfer paper in the past. It’s super easy to use. You basically just need to follow the instructions. (The tutorial above goes into a little more detail on this.)
One caveat: I did have a problem with mine wearing off after a number of washes. I used the transfer on a t-shirt and I’m sure that was one of the reasons it started peeling — generally, you’re going to be washing that much more than you would an accent pillow. One tip: I found out later on that you can re-adhere a transfer using the same steps of the initial transfer.
2. Watercolor pillowcase
How to have a little summer all year round: follow this cute tutorial.

There are a lot of DIY pillow tutorials for applying watercolor techniques to fabric. This tutorial, though, seemed to be A: the most affordable, and B: the easiest to follow.
I do have some recommendations when following this DIY or similar watercolor methods:
- You can use fabric medium if you’re afraid the color will fade or wash out of the garment, however in my experience acrylic doesn’t wash out without rubbing alcohol. I wish I had known that in the past. I might have kept some of my paint-stained clothes intact.
- Adding the water to acrylic will prevent the “crunchy” fabric texture that happens when straight acrylic is applied to clothes.
- If you want to save yourself some time on a project like this, have a spray bottle with some water handy and use it to wet the fabric, instead of a paintbrush.
3. Conversation Heart Pillow Cases

I saw these pillows last year and I swooned for an unhealthy amount of time. Though this DIY is technically Valentines Day themed, these adorable pillows could add a really cute touch to a bed or couch any time of year.
- Although the tutorial uses a sewing machine/hand sewing, you could also make these using hot glue (especially if you’re like me and sewing machines never seem to do what you want).
- For a no-sew version, you could also use hem tape which essentially seals the seam using heat. You might want to make the pillows a little bigger if you’re using this, though, as your tape lies flat, taking up more space to seal it.
- I think a stencil and some fabric paint or markers might work for the phrases as well.
Medium Difficulty Tutorials
4. Ice dye pillowcases
You can get a completely unique design with ice and a little dye.
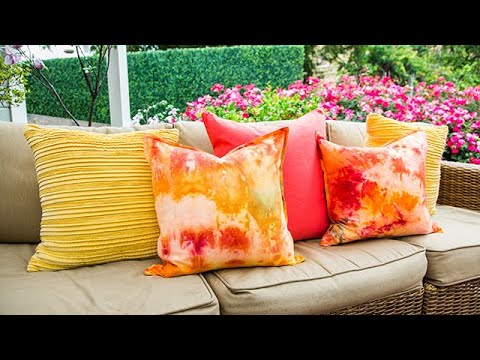
Though this process is easier than regular tie-dye (specifically, no intricate folding or rubber bands), it still has a number of steps and things you don’t want to miss while doing it. A few tips:
- Make sure you get powdered dye for this. Liquid dye will soak into the garment and spread more. The main problem in this is there will be less white space and the colors will bleed, losing the watercolor effect.
- Use the dye sparingly. The more you add, the darker the colors. Although in most cases it will seem like you don’t have enough dye, you will. It soaks into the garment as the ice melts.
- Cover the garment in ice. This will create a more organic look and keep the dyes from getting too dark on the garment.
- The longer you leave the dye on, the deeper the pigment. Most recommend leaving it for a number of hours, some even overnight to fully soak the dye.
5. Pom-pom pillow

This cute little tutorial is giving me some major Urban Outfitters vibes. It also looks super fluffy (my cozy kryptonite).
The hardest thing when making this pillow is probably the pom poms, and that’s mainly because making them is a process. This tutorial uses a pom pom maker ($5.99 on Amazon). Though here’s a tutorial for how to make pom poms with a cardboard template if you’re not sure you can justify buying the maker.
Harder Tutorials
6. Oreo pillow

This DIY pillow requires a bit of sewing and patience. The tutorial is user-friendly and easy to follow, but the process can be a bit time-consuming. On the other hand, though, how many people can say they have an Oreo pillow?
A couple quick tips for this one:
- It might be a good idea to watch the full tutorial before diving into the process. I’ve made the mistake before where I’m halfway through before I realize I don’t have all the materials, or I messed up the project.
- You can also customize this. Use a different color for the cookie or filling. For instance, for mint Oreos, substitute the white for mint green. You could also choose a different color of fabric for the cookie altogether. (Golden Oreos, anyone?)
7. Shibori/Tie Dye
This is the best way to add some fun retro vibes to any room.

Technically the designs for this DIY bed pillow can be used in tie-dye as well. It’s a great primer on the tie dye technique.
If you want the more traditional tie-dye with numerous colors (instead of the two-color shibori look above), you can retie the garment after the initial dye and soak it in another color (that’s what I’ve done in the past). Though if you do this, try to stick to colors on the same side of the color wheel, warm colors with other warm, cool with other cool.
You can also follow the steps in the video below if you want to do more than two colors:

These methods are considered more difficult because there are a number of steps to make sure the final product turns out the way you would like. Also, follow the directions on your dye for success in this project.
What do you think of our DIY pillows guide?
I think I need to add a dozen white pillowcases to my wishlist so I can try all of these DIY bed pillows, and it’s not just because the ice dye and the conversation hearts pillows are my entire aesthetic.
Which diy pillows do you want to try the most? What’s the style of your dream bedroom?