
I know that the love for cute animals is evident here at CF (especially in our weekly Hautelinks column), so this week, I decided to channel that into an easy kitten nail art tutorial. I hope you guys enjoy!
Table of Contents
What You’ll Need:
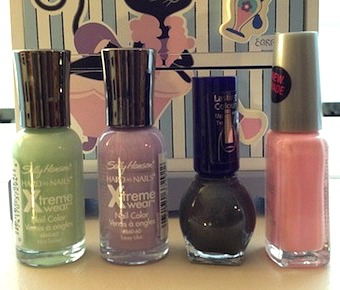
- A black or dark grey polish – I used Miss Sporty’s New Black. (For a similar look, try China Glaze’s Concrete Catwalk.)
- Two colors, one for an accent nail and another one for the rest of your nails – I chose Sally Hansen Xtreme Wear’s Lacey Lilac and Mint Sorbet.
- A pale pink color – I used Wet N’ Wild’s Tickled Pink.
- A top coat or a matte top coat
- A dotting tool in two sizes (More about dotting tools here.)
Step 1:
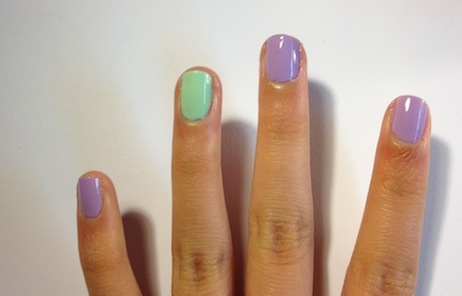
Paint on your base coat. I wanted to stick with pastel colors for a spring feel, so I did an accent nail on my ring finger with mint green and left the rest of my nails lilac.
Step 2:
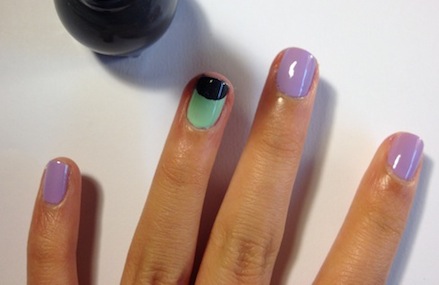
After the base coat dries, paint a half circle on the outer quarter of your accent nail to represent a cat’s head. I didn’t have a black polish, so I used a dark grey shade instead. Whichever color you choose for this step, make sure it’s an opaque polish, so you don’t have apply more than one coat.
Step 3:
While the half circle is still wet, dot two small pools of polish, one on each side, where you want the ears to be. Then, using a thin dotting tool or a toothpick, drag the dot into a point to make triangles. Fill them out as needed. While waiting for your accent nail to dry, you can move on to your other nails to save some time.
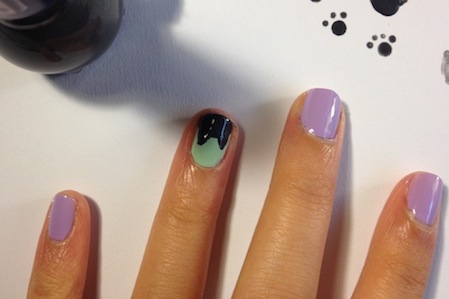
Step 4:
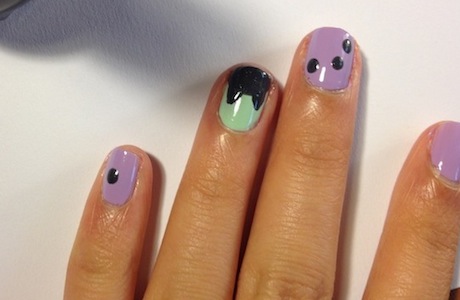
For the paw prints, take your larger dotting tool and make two or three dots on your middle finger (or however many you can or want to fit). Make sure these are spread out evenly with enough space for the smaller dots. Since it’s the smallest, I stuck with just a single dot on my pinky finger.
Step 5:
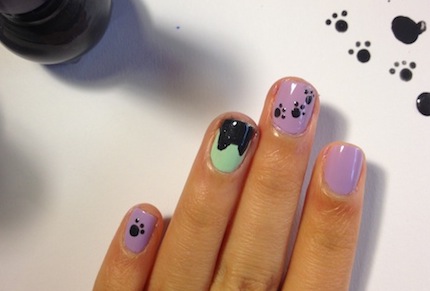
Now it’s time to complete your paw prints. Using the smaller dotting tool, add three dots beside the larger dot to complete the paw. Make sure to apply the same amount of pressure when dotting (try a few practice dots on a piece of paper beforehand) to avoid any inconsistencies or mistakes.
Step 6:
Now, going back to the accent nail, it’s time to complete the cat. Start by making sure your base coat is completely dry. With your pale pink polish and small dotting tool (you can use a toothpick if you don’t have one), fill out a small triangle in each ear. Then, make a tiny matching pink nose near the tip of the nail.
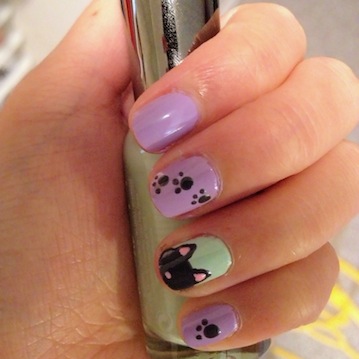
There you have it! Super-cute, right? Of course, you can add paw print nail art to the rest of your nails as well and personalize the look as you please. I decided to compete this look with a matte top coat and am loving the effect, but you can leave it as-is or add a normal top coat to smooth everything out.
What do you think?
How did you like this kitten nail art tutorial? Will you be trying it out? Any questions, comments or suggestions are always welcome so leave them down below in the comments section!
I love this!!! My girlfriend knows I like trying new nail art so she sent me this, it took me a few tries for the accent nail but it turned out really nice!! 😀 thanks tons!
kitties!! Doing a kitty design on my nails RIGHT NOW
You are so talented! I don’t have the patience to do this on my own nails, but kudos to you for making such awesome designs. I would totally pay you to do my nails haha