Lauren Conrad, or LC as some us from may remember her from Laguna Beach, has grown into quite the beauty trendsetter in recent years. How many of us fell in love with (and still rock) the braided bangs hairstyle she popularized?
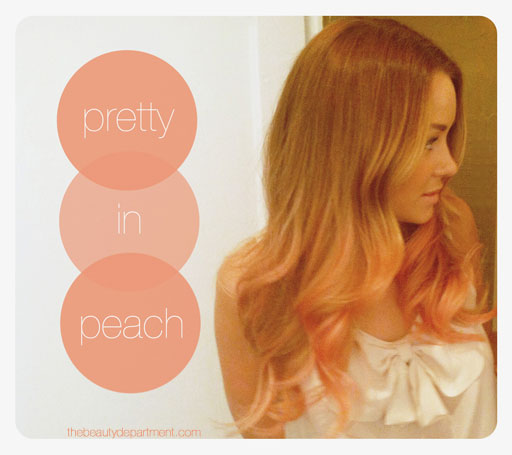
And she set a major beauty trend this season: At the beginning of this past summer, Lauren debuted her bright, multi-colored dip-dye locks and set off another craze.
And Lauren wasn’t alone in trying this look – everyone from Kate Bosworth and Nicki Minaj tried the dip-dye trend this summer. And just recently, Lauren herself gave the style another go with an orange-pink shade inspired by My Little Pony (right photo above).
Unlike Lauren, however, few of us can afford a celebrity stylist, nor can we commit to a permanent dye job… but that doesn’t mean we can’t try this trend! A few weeks ago, we found an effective yet temporary DIY technique to achieve the look. Erica Worzel discovered a great technique she calls “hair chalking” and shared it on her blog. So that’s the look we’re recreating today.
Continue reading to learn how to recreate Lauren Conrad’s dip-dye tresses at home in just 3 simple steps.
Table of Contents
You Will Need:
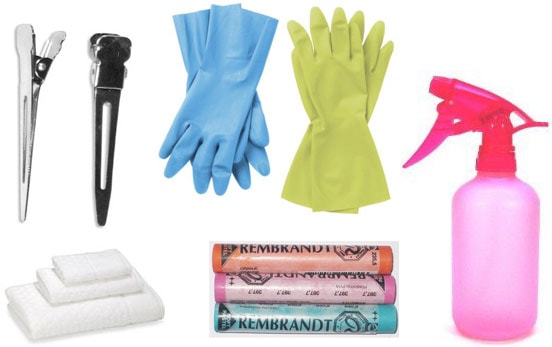
- Rubber Gloves. Yes, this gets messy – gloves will keep your hands from looking like a Jackson Pollock painting.
- An old towel or t-shirt to wear during the process (for the same reason as above).
- A spray bottle of water
- Clips to section your hair
- Most importantly, soft chalk pastels (Rembrandt pastels work best.)
Note: I actually used another brand of pastels before switching to Rembrandt. I first tried using Cray-Pas pastels, however, the color didn’t transfer well at all.
Rembrandt is more expensive, but I was able to purchase some individually at my college’s local art store for a few dollars a piece, instead of purchasing an entire pack with colors I didn’t even want. Believe me when I say Rembrandt is well worth the money.
1. Section + Dampen
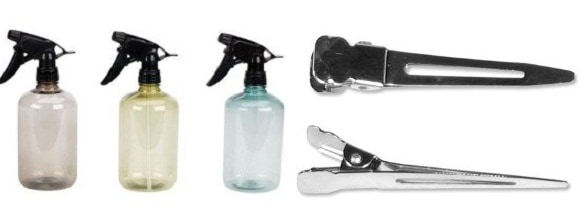
Product Information: Spray Bottles + Hair Clips both from Amazon
Separate the strands of hair you would like to color and use the spray bottle to slightly dampen the hair. If you don’t have a spray bottle on hand, simply running a comb under water will work just fine.
2. Color
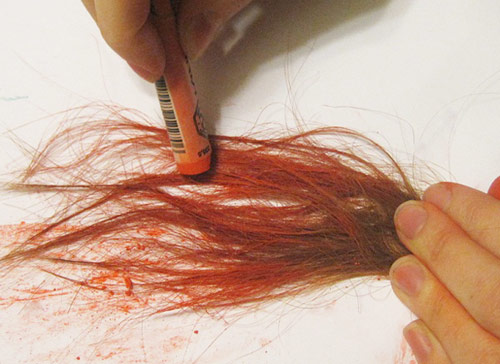
Simply take a section of dampened hair, hold it tight and rub on your choice of the colored pastels in a downward direction until the color adheres. My boyfriend actually had the genius idea of laying my hair on scrap paper on a flat surface to rub the pastel on it. SO MUCH easier than just holding it in the air.
3. Style
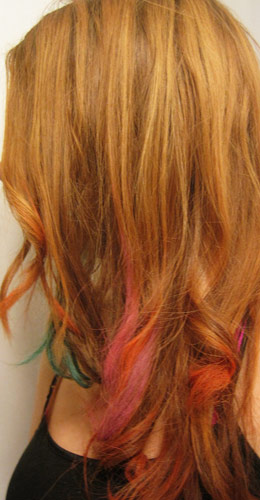
Now that you’ve applied the desired amount of color to your hair, style it as usual. Colored strands would brighten up any braid and they also look adorable slightly curled, just how Lauren often wears this trend.
Here’s a close-up:
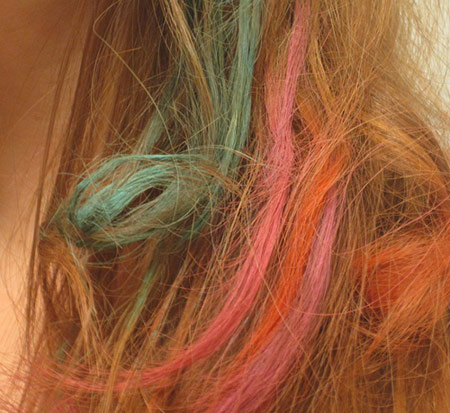
Click on the photo to enlarge.
What Do You Think?
Do you like the dip-dye trend or do you find it too over-the-top? Would you try the trend now that you have a non-permanent option? Or have you already tried this hairstyle trend? Tell us in a comment! Also, if you try this, be sure to leave a comment and share your results!
There is no wax in the pastel.
I applied the color on my hair after blow-drying and also wore my hair curly, so I didn’t use a flat iron. However, I did use a curling iron and it worked, so I imagine a flat-iron would work as well.
@ Audrey– Awesome! I’m so glad you found a less expensive option to work well. I was slightly disappointed I could only get Rembrandt to work.
Thank you for filling us in!
@Sara– mine faded slightly by the next day, I think it wore off slightly on my clothes and blankets; however, I had to shampoo most of it out. It didn’t stain any of my pillows or anything, either
wil this stain any pillows when you sleep or your clothes? and how long does it last? can you just shower it out or no
Thankss!!!xoxoxo
Alright to elaborate on my comment above, Reeves does work! So good! You have to really dampen your hair to make the pastels go on smoother and liquidier/creamier. Otherwise it will just be like rubbing chalk on your hair and it’ll be a powerdy mess. I did find some color on right shoulder…but that was about it. I don’t care, I love this trick!
I agree with elenka. I’ve done this a few times on two of my nieces hair and I use soft pastels, not oil. The regular soft pastels work really well, so I’m not gonna use oil and I think anyone doing this would have a better chance with non oil ones
So can you style your hair with flat iron/ curling irons after the pastels are already on?
Whenever I do this I use chalk pastels, I might give oil pastels a go and see which is better
@Janet– what pastels are you using? From experience I learned that the Rembrandt brand works soo much better than any other. Even on my roommates almost black hair.
Also, it helps to make your hair very damp before applying the pastel.
Hope that helps!
@ Rachel — Yes! it works on dark hair too!
I did some research at http://web.princeton.edu/sites/ehs/artsafety/sec10.htm about art safety and to get information about toxins in oil pastels.
Here’s some info I found:
“Crayons and oil pastels do not present an inhalation hazard, and thus are much safer than pastels. Some oil pastels can contain toxic pigments, but this is only a hazard by accidental ingestion.”
So, since oil pastels don’t have much of a risk of inhalation like more “chalky” pastels do they are much safer. And if they do contain toxic pigments they aren’t a hazard unless actually ingested.
It sounds safe to me; however, no one should use this technique if they are uncomfortable or worried.
I was just about to post a longer warning about exactly what compounds are used to make pastels (both chalk and oil since most of these chemicals are in the pigmentation formulas which are pretty much the same in all professional sets) I would like to add to her comment that most pro-quality pastels also have lead in the pigments to boost the color (anything like Prismacolor that you buy in an art specialty store, oh and lead is harmful to ingest in any amount by the way even nanoliters). However if you can find a kiddie non toxic set from Crayola you should be okay ( they won’t work anywhere near as well but they’ll be much safer).
oh and gloves would be a really good idea as well. safety first haha! sorry to be such a mom!
love, maddie
you realize pastels are very poisenus, right? as an art student, i can say that the pigment in pastels can contain elements that can cause cancers after prolonged use. im not the kind of person who believes that the most bizarre things can cause cancer, but the reds normally contain cadmium. its a really cool trend but if you are going to do this please be careful to wash off any pigment that gets on your skin and thoroughly wash your hair before sleeping to avoid ingesting anything. im not trying to be a downer but i wouldnt want anyone to get sick because of the pastels.
please excuse any typos, this was sent from my smartphone.
love, maddie
Bronies!
Also, I’d love to do this on my dark hair, but would I have to bleach portions of it first?
this looks really cool, however i think the chemicals in the oil pastel might damage your hair. although the pastels are made out of oil, the color dyes can damage the ends of the hair, increasing split ends, broken tips etc…