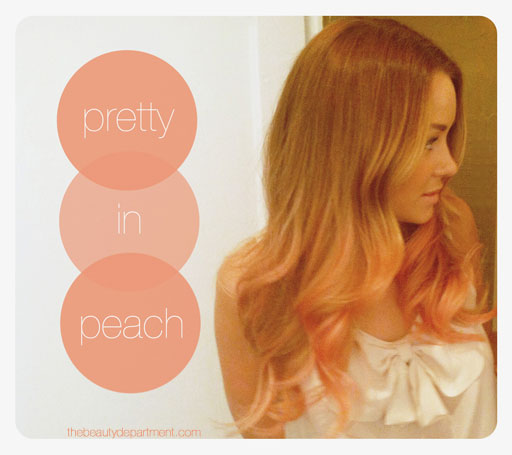
Lauren Conrad, or LC as some us from may remember her from Laguna Beach, has grown into quite the beauty trendsetter in recent years. How many of us fell in love with (and still rock) the braided bangs hairstyle she popularized?
And she set a major beauty trend this season: At the beginning of this past summer, Lauren debuted her bright, multi-colored dip-dye locks and set off another craze.
And Lauren wasn’t alone in trying this look – everyone from Kate Bosworth and Nicki Minaj tried the dip-dye trend this summer. And just recently, Lauren herself gave the style another go with an orange-pink shade inspired by My Little Pony (right photo above).
Unlike Lauren, however, few of us can afford a celebrity stylist, nor can we commit to a permanent dye job… but that doesn’t mean we can’t try this trend! A few weeks ago, we found an effective yet temporary DIY technique to achieve the look. Erica Worzel discovered a great technique she calls “hair chalking” and shared it on her blog. So that’s the look we’re recreating today.
Continue reading to learn how to recreate Lauren Conrad’s dip-dye tresses at home in just 3 simple steps.
Table of Contents
You Will Need:
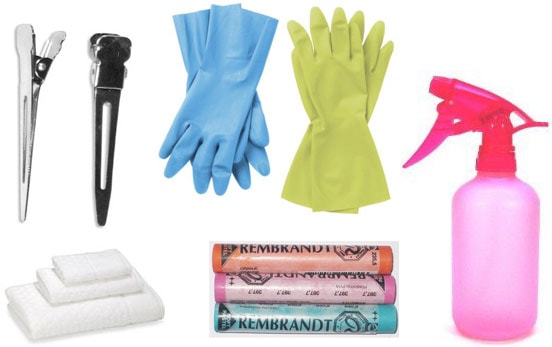
- Rubber Gloves. Yes, this gets messy – gloves will keep your hands from looking like a Jackson Pollock painting.
- An old towel or t-shirt to wear during the process (for the same reason as above).
- A spray bottle of water
- Clips to section your hair
- Most importantly, soft chalk pastels (Rembrandt pastels work best.)
Note: I actually used another brand of pastels before switching to Rembrandt. I first tried using Cray-Pas pastels, however, the color didn’t transfer well at all.
Rembrandt is more expensive, but I was able to purchase some individually at my college’s local art store for a few dollars a piece, instead of purchasing an entire pack with colors I didn’t even want. Believe me when I say Rembrandt is well worth the money.
1. Section + Dampen
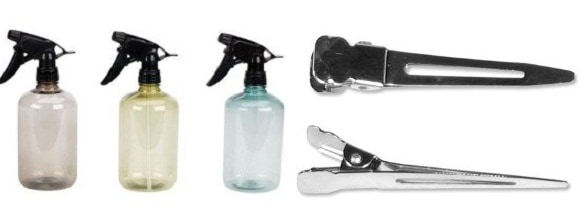
Product Information: Spray Bottles + Hair Clips both from Amazon
Separate the strands of hair you would like to color and use the spray bottle to slightly dampen the hair. If you don’t have a spray bottle on hand, simply running a comb under water will work just fine.
2. Color
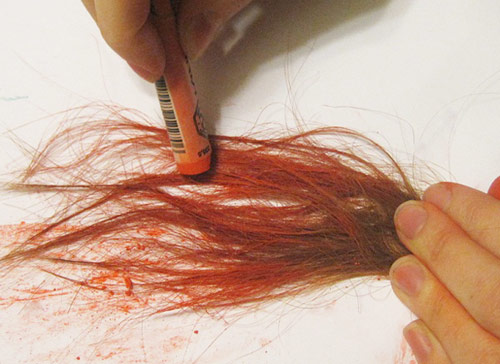
Simply take a section of dampened hair, hold it tight and rub on your choice of the colored pastels in a downward direction until the color adheres. My boyfriend actually had the genius idea of laying my hair on scrap paper on a flat surface to rub the pastel on it. SO MUCH easier than just holding it in the air.
3. Style
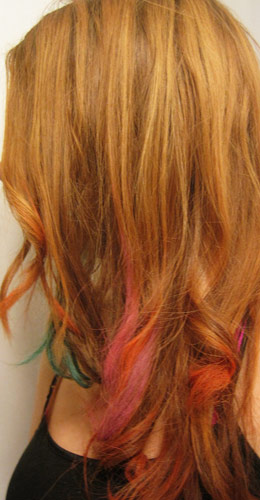
Now that you’ve applied the desired amount of color to your hair, style it as usual. Colored strands would brighten up any braid and they also look adorable slightly curled, just how Lauren often wears this trend.
Here’s a close-up:
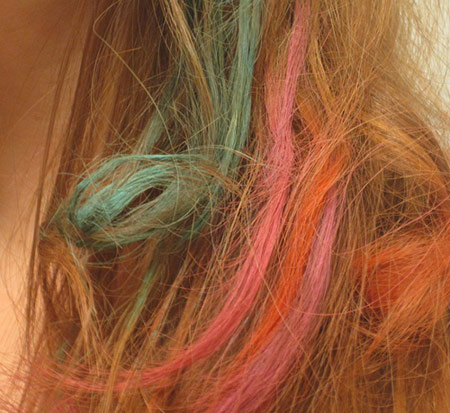
Click on the photo to enlarge.
What Do You Think?
Do you like the dip-dye trend or do you find it too over-the-top? Would you try the trend now that you have a non-permanent option? Or have you already tried this hairstyle trend? Tell us in a comment! Also, if you try this, be sure to leave a comment and share your results!
Then the article should be changed, since it lists oil pastels specifically.
How long will this last?? I want mine to last awhile :/ Like normal dye
The final result is nice, but I don’t know how if the dust from the chalk pastels won’t be a problem.
Sows this end up permanent?….
Will this wash out in the shower??
wow, i tried it, unfortunately the materials weren’t so specific. It said used “soft oil pastel” and that’s what i used. But shouldn’t it be SOFT CHALK PASTELS?. anyway it looked great. but i took a 1hour shower taking out the oil pastel,and there is still some left…Any tips on removing oil pastel on hair PLEASE? :/
I tryed this just now. It works with oil pastels for me but it didn’t when i had my hair wet. It did make my hair all clumpy but i just brushed it out. The only defect is if you play with your hair it’ll some out sooner :/ I love it though and my mom actually let me use this type or dying instead of having kool-aid or other stuff in my hair.
I tried this and it worked very well!
I tried it with oil pastels and was freaking out at first that it wouldn’t wash out. But it DOES wash out, so don’t be scared to try this. =) It’s pretty fun but it takes a while for the color to show up. I had a little hair breakage because I pressed to hard at first, so be careful with that.
I started out with wet hair and put the chalk on that, but it didn’t work very well and it wouldn’t stay wet long enough for me to cover one piece of hair. I tried using it on dry hair and it worked MUCH better for me, so experiment with that.
The only thing that I don’t like about this pastel thing is that my hair got really stiff where I put the color (to be expected), but it beats using a permanent dye by all means! =)
Super fun to do with friends as well! Thanks for the great idea!
Does this work on straight hair?
Tried this yesterday and it was a complete disappointment. I have blonde hair, used oil pastels and the color didn’t stay at all.
Residue got all over clothes (even with hairspray) and I couldn’t brush it at all.
It was a chunky, gross mess.
You can do practically the same with eyeshadow/makeup pigment. I like Urban Decay since they try to use less harsh chemicals. However, UD is pretty expensive. I have dark dark dark brown (Asian) hair and if I wet my hair enough beforehand, I get some pretty nice results! (:
…you CAN’T use oil pastels. It won’t work. The chalk has to be able to dissolve or soften with water.
I really love this!
I just tried it right now with Cray-Pas oil pastel junior artist 16 piece set for 2.99 at Hobby Lobby and it did not work so well. I brushed right out. I have medium/dark hair. May have to try a other brand.
I’m doing this tonight, but with two colors, instead of 3 or 4 and I’m using hair dye. c: It’ll be tricky but it’s worth it. I’m using a teal-ish color and pink! 😀