A few months ago, I taught you how to sketch a fashion figure, and this time I’ll be going into detail on how to draw a fashion face.
Unlike with fashion figures, which require exaggerated proportions, the rules for drawing the fashion face are pretty similar to the rules for drawing a realistic one. However, the fashion face is one of the key areas where designers can incorporate their own style.
Below, I’ll show you the step-by-step process of how to draw a more realistic face in a frontal view, then give you some ideas for alternative versions:
Table of Contents
Front Face:
Step #1
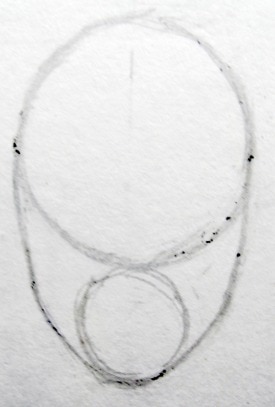
Click to enlarge.
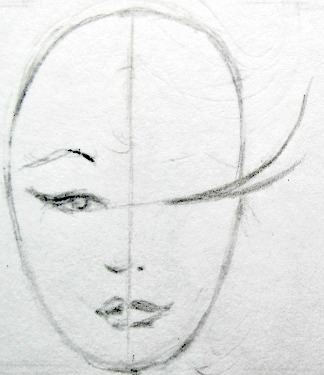
Draw the head by sketching a large circle on top with a smaller circle below. Connect the two with rounded diagonal lines to form the sides of the face. Make sure to draw a line down the center in order to ensure that the face is balanced.
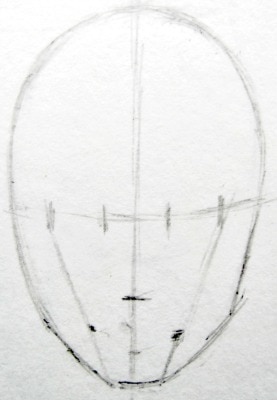
Step #2
Click to enlarge.
Draw a horizontal line in the middle of the face. This is the line where the eyes will be illustrated. Mark the size of the eyes on both sides of the vertical center line. Make sure to leave a space in between the two eyes which is the same size as an eye.
Additionally, mark the nose, which is about 2/3 of the way down from the eye line to the chin.
Lastly, indicate the lips by drawing the corners which will be halfway between the nose mark and the chin. The corners of the lips can be determined by drawing a diagonal line from the far corners of the eyes to the chin as seen below.
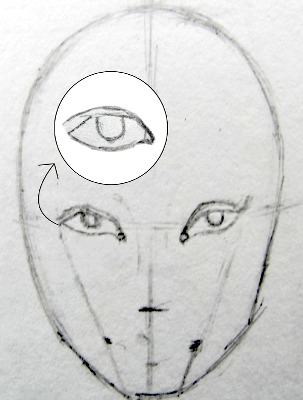
Step #3
For the following steps, I have drawn the face to be more realistic on the right and slightly more exaggerated as another approach on the left.
Click to enlarge.
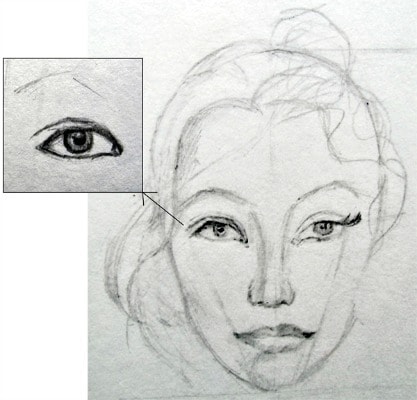
For the eyes, draw an almond shape, which tapers off into the tear duct at the ends closer to the center of the face. Draw three-quarters of a circle in the center of the almond shape for the iris, leaving about 1/3 of the almond empty below the circle. Next, draw a line for the eyelid above the almond which follows the top line of the eye.
On the left, I enlarged the eyelid, slanted the eye, and extended the eyelash to create a more of a cat-eyed look.
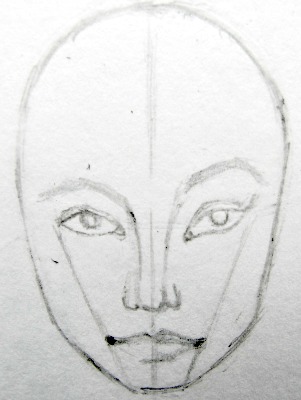
Step #4
Click to enlarge.
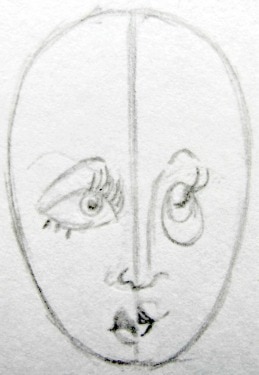
Draw the eyebrow a bit above eyelid. On the left, I arched the eyebrow a bit more. The eyebrow extends a tiny bit further to the side of the face then the eye.
Create the nose by drawing a “U” in the middle of the line with a second, but more flat and small “U” to each side. The nose should look a bit like a wavy line, with a small hump between each U for the nostrils. Illustrate the lips by marking the bottom (halfway between the corners of the lips and the chin).
Draw a long diagonal line with a small diagonal line going in the opposite direction for the top lip from the center of the face – this will create the cupid’s bow. This line should end similar to where the nostril begin if a vertical line was drawn between the two, they should line up. Shade the top lip, which should be darker than the bottom one and about 1/3 of the whole lip. On the left, I made the top lip slightly more larger and defined.
Step #5
Click to enlarge.
Draw a smaller three-quarters of a circle within the iris for the pupil, then shade it in, leaving a little piece of white for the shine in the eyes. Also lightly shade in the iris, which won’t be as dark as the pupil. Begin to shade in the nose to by lightly extending the U in the center in order to add dimension. Lightly draw rounded vertical lines from the eyebrows to the center U of the nose in order to create the bridge of the nose.
Step #6
Click to enlarge.
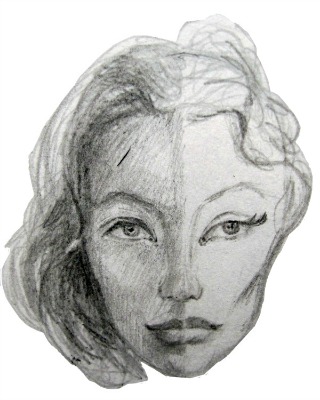
On the right, I shaded the face in more to demonstrate the difference between a more realistic face and a more exaggerated one on the left. For the lips, I left some light space to separate the top lip from the bottom. Additionally, I shaded the bottom of the lip to create its dimensional shape. Unless you want your figure to have lined lips, do not outline the feature, just shade.
Alternative Versions
Once you master the basics proportions, feel free to play around with different styles. Fashion faces can be more simple and abstract, even ignoring the proportions which make the face realistic, like the examples below (for each side of the face I tried a different style):
Click to enlarge.
Your Thoughts?
What do you think about the fashion face? What else would you like to learn how to draw or make in terms of fashion? What style of the fashion face do you prefer? Post pictures of the ones you drew in the comments below!
I love fashion and am trying to perfect my drawings, this was very helpful and very cool!
Thanks so much, really helped my drawing skills and now i have had an A* in my art exam! Thank again, you were a BIG help
Very useful. Thanks 🙂
Hey Whitney!
Thanks so much for this article!! I was wondering if you could answer a couple questions about parsons.
1. What is the application process like? I’m only a sophomore in high school and while I do draw fashion sketches regularly (daily in the summer when I have time) but I have no clue how to sew… Is that something I need to be able to do before applying? Also are the academic components (GPA, sat scores, etc) as important as the portfolio?
2. What is the general atmosphere like there? Would you say that the social life is comprable to any other more “traditional” rigorous school?
Thanks!!
Love this. Wish I could actually draw. I have already seen this on my Pinterest Feed FYI
Ah, thank you so much! I’ve really gotten into sketching this summer (just for fun). I took a class on illustration but the professor was very stringent and would not allow us to “play” (if we wanted a good grade in the class). So I’ve been teaching myself how to sketch. Faces are definitely the most difficult part for me! I’ve gotten down the figure pretty well, but I take forever to finish a face to the point that I’m satisfied. Thanks again!
Amazing! I love your posts! But i think you meant to say that you drew the face more exaggerated on the right side? Maybe the camera flipped your drawing?
This is so cool!