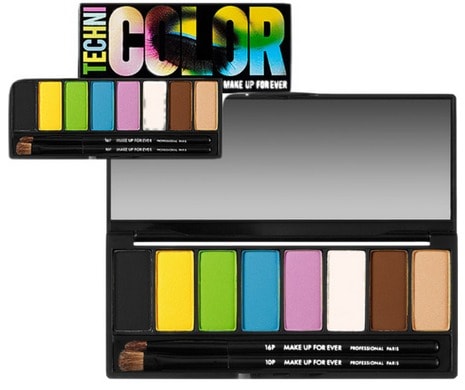
Makeup For Ever Technicolor Palette – $36 at Sephora
This week, I was walking through Sephora, looking for some inspiration for this week’s post when the Make Up For Ever Technicolor Palette immediately caught my eye.
I couldn’t help myself from swatching the bright colors on the back of my hand to test out the pigmentation, and let me tell you guys, I was so surprised at the amazing quality of these colors. They blend nicely and are not powdery at all – I guess you can say it was love at first bright (eyeshadow).
To me, an eyeshadow addict, $36 was a great deal for such pigmented colors. However, you may feel differently, so if it’s out of budget for you (or eyeshadow is more of a special occasion thing), feel free to use whatever colors you have on hand. (For lots of similar shades at a great price, try the popular 120 palette that we’re always talking about!)
Inspired by this gorgeous new palette, below, I’ll show you 4 different eyeshadow looks — from neutral to super-bright — that you can create with the Technicolor Palette. Scroll on down to check them out!
Table of Contents
Look #1: Subtlety is Key

This look is extremely subtle (it’s probably the most natural look that can be created with this palette), but you can always spruce it up by building the crease with more colors
Want to go for a dark smokey eye? I suggest adding a lot more of the brown and black into the crease and perhaps under the lower lash line.
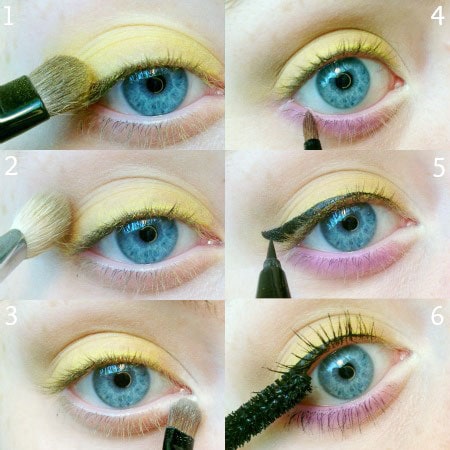
Tutorial:
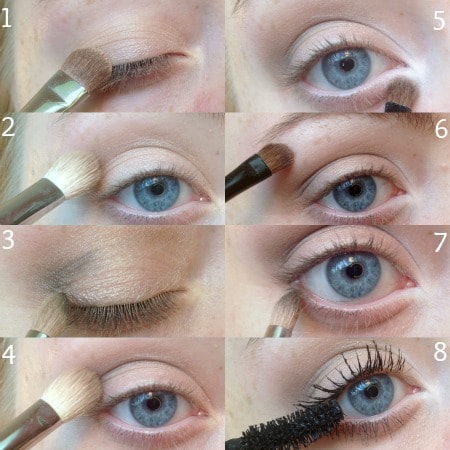
1. After applying your eyeshadow primer (I used Too Faced Shadow Insurance) with a flat shader brush, I took the lightest champagne color and applied this all over the lids to give them a beautiful subtle glow.
2. Taking a fluffy blending brush and the dark matte brown, I swept this into the crease using circular motions to add more depth.
3. With a pencil brush and the black matte color, I created a light ‘V’ shape in the outer most part of my crease/lid, blending it to soften the color.
4. With the same fluffy blending brush that I used earlier, I finished blending the black into the crease very lightly, also using circular motions.
5. I then used the small brush provided in the palette and used the matte white color to brighten up my inner corners.
6. The same color was used under my brow bone as a highlight.
7. I thought that keeping this look as subtle as possible would be key, so I skipped the top eyeliner and instead used the same pencil brush to apply the dark matte brown color under my lower lash line.
8. I then curled my lashes (I used my eyelash curler from Tarte) and applied my Maybelline Volum’Express The Falsies Flared Mascara to create beautiful, long lashes.
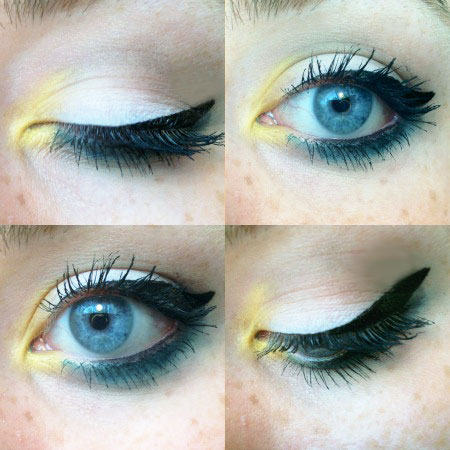
Look #2: Spring Fever
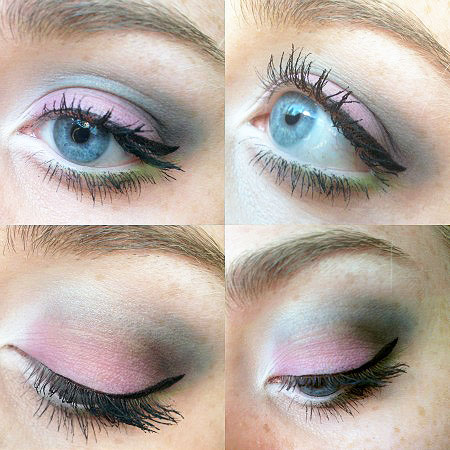
I really wanted to include a springtime look in this week’s post that was out of the ordinary — something that might be a little out of one’s normal comfort zone — and I think this is the one!
This look uses purple, green, and blue eyeshadows, yet is still totally wearable for day or night. Just pack on the colors to your liking. (My version – which could work for a fun lunch out with friends – is a little more bright yet subtle/watercolor-y in person, if that makes sense. I’d add more color for a bold night look.)
Tutorial:
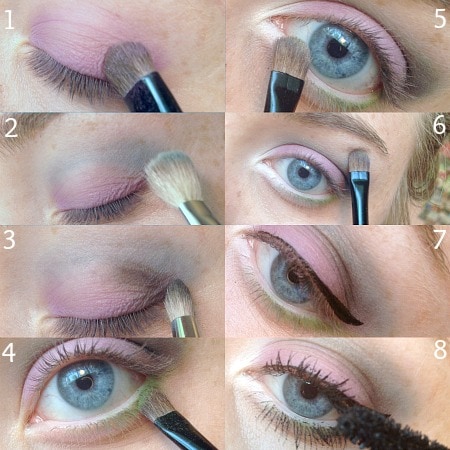
1. With a flat shader brush, I packed the light matte violet color all over the lids.
2. Using a fluffy blending brush, I blended the matte blue color into the crease.
3. With a small pencil brush, I created a ‘V’ shape into the outer lid/crease.
4. Using the small pencil brush provided in the palette, I took the matte green color and placed it on my lower lash line to give a beautiful springy vibe.
5. With the other brush given in the palette (flat shader brush), I took the matte white color and put it in my inner corners to brighten them up.
6. Next, I used the same white eyeshadow under my brow bone as a highlight.
7. I took my favorite liquid eyeliner and created a medium sized cat eyeliner wing.
8. Finally, I curled my lashes and applied a boatload of mascara.
Look #3: Pansies before Dark

This look is so unexpected yet totally wearable and that’s why I love it. The combination of yellow and purple eyeshadow reminds me of the colors of a pansy, and the combo looks strikingly beautiful on the eyes!
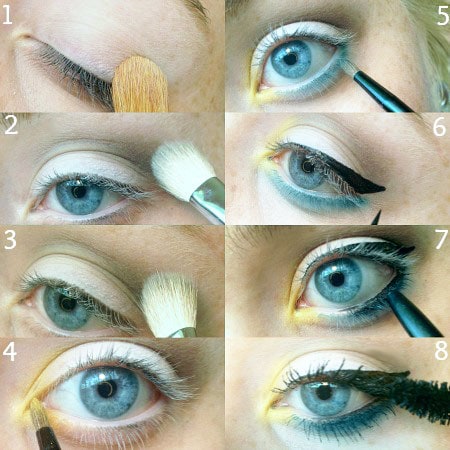
Tutorial:
1. With a flat shader brush, I packed on the matte yellow color all over my eyelids.
2. With a fluffy blending brush, I blended the dark matte brown color into my crease to add dimension.
3. With the small brush provided in the palette, I applied the matte white color into my inner corners (as well as under my brown bone as a highlight) to brighten my eyes.
4. With the other small brush provided in the palette, I packed on the matte violet color and swept that under my lower lash line to add a pop of unexpected color.
5. Next, I applied some winged eyeliner with a liquid liner. (You guys know I love my liquid liner!)
6. Lastly, I curled my lashes and applied several coats of mascara. This really open my eyes, making them (and the color) pop!
Look #4: Blue Under-Eye Smokey Eye
With this eye look, I wanted to take the infamous under-eye smokey eye and incorporate color into it. I love that there’s an unexpected spark of yellow in the inner corners as well as some blue that is blended under the lower lash line.
This look in particular is all about keeping the top of the eye as light as possible, while also including some subtle shading, and having the main focus be on the dramatic lower lash line.
Tutorial:
1. With a big eyeshadow brush, I swept the matte white color all over the lids.
2. Taking a fluffy blending brush, I blended the matte brown color into the crease.
3. Using the same bush, I added some matte black into the same area, in order to create more dimension. Remember to use a light hand when applying, since the colors are extremely pigmented and you want to try to keep the top of the lids as subtle as possible.
4. Using the small brush provided in the palette, I applied the matte yellow color into the inner corner of my eyelids to brighten up my eyes and add a pop of color.
5. After cleaning off that brush, I then picked up the matte blue color and ran that along my lower lashes to start building up the smokey eye.
6. Of course once the eyeshadow is completed it is now time for the eyeliner (skip it if you’re not as obsessed as I am), so I created a dramatic cat eyeliner effect to bring all the colors together using the same liquid liner as before.
7. I then took my black eyeliner and ran this along my lower water line as well as my lower lash line to really darken up the look.
8. Then I curled my lashes and applied two coats of mascara to really darken up the look and add lots more drama – perfect for a night out!
Thoughts?
To me, this post is all about challenging yourself to incorporate more color into your everyday eyeshadow looks. You’ll be surprised by how good it looks to just add a pop of color into your everyday makeup routine. So unexpected and perfect for the season!
Now I want to hear from you! Do you like the tutorials? Will you be trying any of these out? Which one was your favorite? What do you think of this eyeshadow palette? What other beauty tutorials would you like to see me do? Let me know by leaving a comment!
soo pretty and different! <3