Some people are really awesome with organizing and remembering things. Unfortunately, I’m not one of those people. Even though I’m a good student, I never seemed to remember when my assignments were due… this is, until I discovered the following trick. With a busy life balancing class, work, and friends, sometimes it can be difficult to remember what needs to be done. This method has helped me in so many ways and I want to share it with all of you!
Note: This trick involves a digital schedule/calendar. I know some people like to keep a written schedule, and if you think that would work better for you, simply scroll to the bottom of the post for an alternative.
For this tutorial, I’ll be using Google Calendar. If you have another email provider, most have similar calendar features. Or, if you have a Mac, you can use iCal. There are also third party apps you can use, such as PocketLife and Schedule Planner.
Table of Contents
Step 1: Open up your calendar
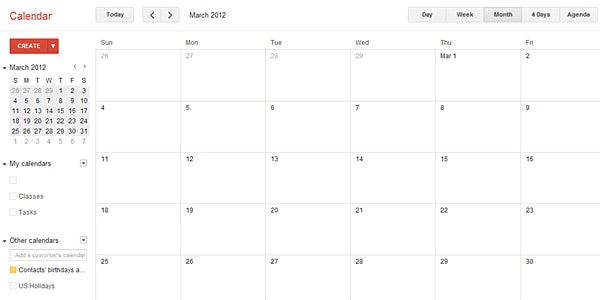
For this tutorial, I’ll be using a past month. Now, let’s get acquainted with the calendar. What I find most helpful is to set it to “month” view, which should look something like the above picture. There should be a section similar to where it says “My Calendar” on the left. You can use the default calendar, or create your own. I have a separate calendar for my classes and for my tasks.
Step 2: Create an event
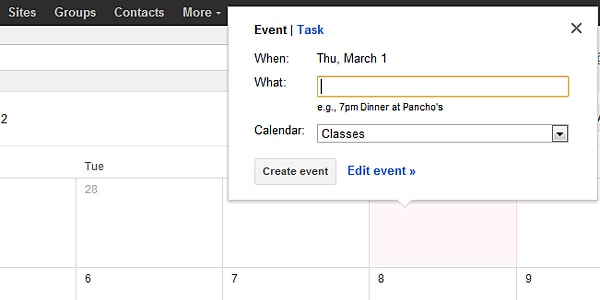
For this step, click on the day that your class starts and a box will pop up like the picture shows. Then, click where it says “Edit event” and you will be taken to a page like this:
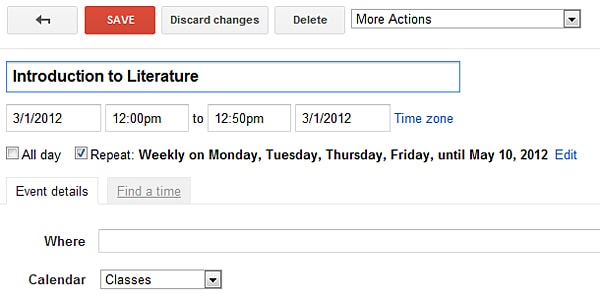
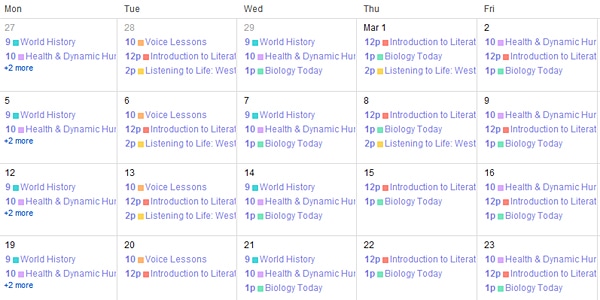
Once you get to this page, enter your class information as I have done here. You can also color code your class. Make sure you set your event to repeat weekly on the days of your classes (like I did for M, T, Th, F) up until the last day of the class (for me it was May 10th). Once you click “Save,” you should see your class appear on all of the days. Repeat for all of your classes, and eventually your calendar will look like the picture below!
Phew! Now that we have our classes all set and done, it’s time to enter our assignments.
Step 3: Create a task
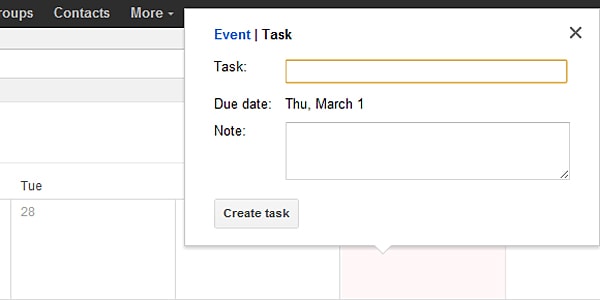
Similar to before, click on the day you want to add a task on. Instead of clicking on “Event,” make sure that you select “Task.” This part gets quite tedious, but for me it is well worth the time spent. Make sure you have your syllabus for each of your classes at this point. In the yellow box where it says “Task:” I write my class name. Then, in the “Note:” box, I write what the assignment is. If your syllabus is online, it makes it a lot easier if you just copy and paste the information in. Keep in mind, tasks are put on the days due.
Step 4: Check off finished tasks
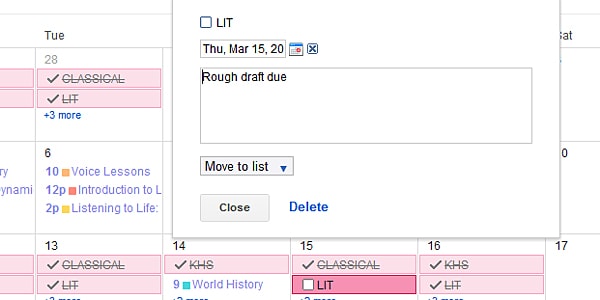
As you can see on the above photo, this is an assignment that was entered to be due on March 15th. As soon as I turn in one of my assignments, I make sure that I check the box beside the task. At this point, the task should become a faded color and have a strikethrough.
Step 5: Your completed schedule
Now you’re all done!
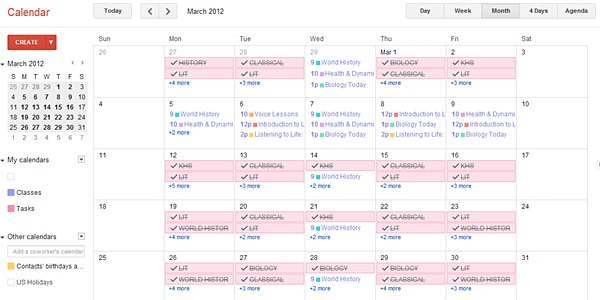
The above photo is what my schedule looks like once I have entered my tasks and events. Of course, you don’t have to just limit yourself to assignments and classes! You can also include other things you have planned and need to get done as well as creating multiple calendars to view them all separately and keep them organized.
Alternative Method
For those of you that prefer not to use a digital planner or simply don’t have one easily accessible to you, you can create a schedule on paper. The difference with this is that it is easier to create weekly schedules instead of having the information all included in advance. If you would like, you could also make a template on excel to fill out each week. (Or, if you would rather stick to paper, that’s fine, too.)
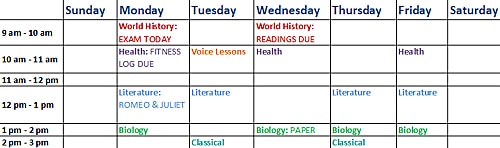
Basically, as seen in the image below, you list the days of the week on the top (horizontally) and the times of the day on the side (vertically). The times can be hour intervals, half hour intervals, or whatever works best for you. I only did mine from 9 am to 3 pm because I had no classes or important events beyond this point for the most part.
Next, list your classes under the correct day and time slots. Then, check your syllabus to see what is due in that class that day and include it under the class name. When you finish an assignment and turn it in, simply cross it off.
Voila! There you have it, your own class/assignment schedule.
I hope these methods help you as much as they have helped me!
What are your thoughts?
Do you use an online schedule or do you prefer to write one out? Do you use a schedule at all? Do you have any other tricks we should know about? I’d love to hear from you!
Great post! I’m wondering, however–how do you get those little colour-coded squares to show up in front of your calendar entries? When I enter mine there are no squares, but the whole entry title is coloured. It doesn’t matter too much but I’m curious. Thanks!
Thank you so much for this post Jade. Google Calendar is too complicated for me. And since I don’t have an I-phone, I don’t really find it very convenient. I hope that you could write an article about keeping a clean and ordered inbox, and how to synch different email addresses. I am ashamed to say that I’m still confused about it.
Thank you.
I love this! I’m super obsessed with all things organization, so as soon as I saw this I went and made one of my own. Usually I like to have things written on paper in front of me, but I’m really excited to give this new electronic method a try 🙂
I loved this advice! Very useful. Usually I’m not very much into digital stuff, so I keep a diary besides this, but I’ve also found Google Calendar very helpful because I can now make as big notes to each event as I like, as opposed to the limited space you have in most of the pretty and affordable diaries.