
If you’re on Instagram constantly (hi, same here), you’ve definitely seen the wide array of beautiful and well-constructed flatlays all over your feed. Today, I’m going to show you the best flatlay tips to beautify your own feed.
There is a secret formula that allows our favorite influencers to create visually compelling and striking layouts of accessories and props that make us want to zoom in and admire every inch.
So how do they do it? What’s the secret to creating a perfect flatlay that looks effortless and yet stylish at the same time?
Let’s delve in together.
Table of Contents
1. Pick the Right Theme
The key to crafting a beautiful flatlay is to have a theme. This allows you to create a visual story.
Are you focusing on fashion? Beauty? Fitness? Is there maybe one specific product or piece that you want to highlight?
Choosing a theme for your flatlay will make it so much easier to pick out the props and accessories because you’ll be able to see how each item matches your featured item or idea. Like curating a collage or moodboard!
This also relates to your color scheme – do you want it to be light or dark?
If you’re going for a moody theme, you would pick darker items or a dark background, and lighter items for lighter themes. To keep it simple, pick a neutral background and let your accessories speak for themselves!
2. Get the Perfect Lighting
The is one of the most important flatlay tips — get the lighting right!
As with most photos, it’s best to shoot your flatlay in natural lighting. When you’re taking pictures of objects (like the accessories and props you’d use in flatlays), this is especially true, as natural lighting minimizes shadows.
The best time to take advantage of natural light is in the morning or early afternoon, and ideally by a large window or door.
If you absolutely can’t take advantage of the natural light, try experimenting with bright lights in your space and the flash on your phone camera. While this will create shadows, you can totally play around with the positioning so that the shadows are like an additional accessory and don’t ruin the composition of the photo — see example below!
3. Keep it Balanced
Proportion is so important when creating a flatlay! It’s a delicate balance, but it also can be totally unique to you.
Let’s say you’re trying to showcase a magazine or book in your flatlay – since the book is a larger item, pair it with smaller accessories and props, like a bookmark or a watch. Or, take it in the opposite direction and pair it with a cup of tea or coffee – this would make the photo look cozy, and show that the theme is a relaxing day in with a book.
Balance also means working with the space in your photo. In the photo below, blogger Caroline Chagnon has her items stacked but has lots of negative space to balance out the photo.
Or, maybe you’d want to space out each item in your photo and have less negative space. As long as it looks balanced, you’re on the right track.
4. Put Time Into the Layout
Whether you like your flatlays to be clean or scattered, never settle for your first layout. Take a few photos and then try swapping the items and changing their positions until you find the perfect shot.
You can be as creative as you’d like here! Try stacking items for a unique shot, turning larger items, like shoes, on their side. Another idea, as shown in the photo below, is to have some of your items just out of frame – this makes the photo look so effortless and chic.
5. Accessorize with the Perfect Props
Once you have your main pieces, you can start filling up the rest of the photo! This is my favorite flatlay tip because it’s fun – get creative and “shop” your house for the perfect accessories.
Looking back at my favorite flatlays, I see that the experts tend to use dainty jewelry pieces, facial oils and lip glosses as props. However, candles, perfumes, flowers and cute household items can really complement your theme, so they’re definitely worth experimenting with!
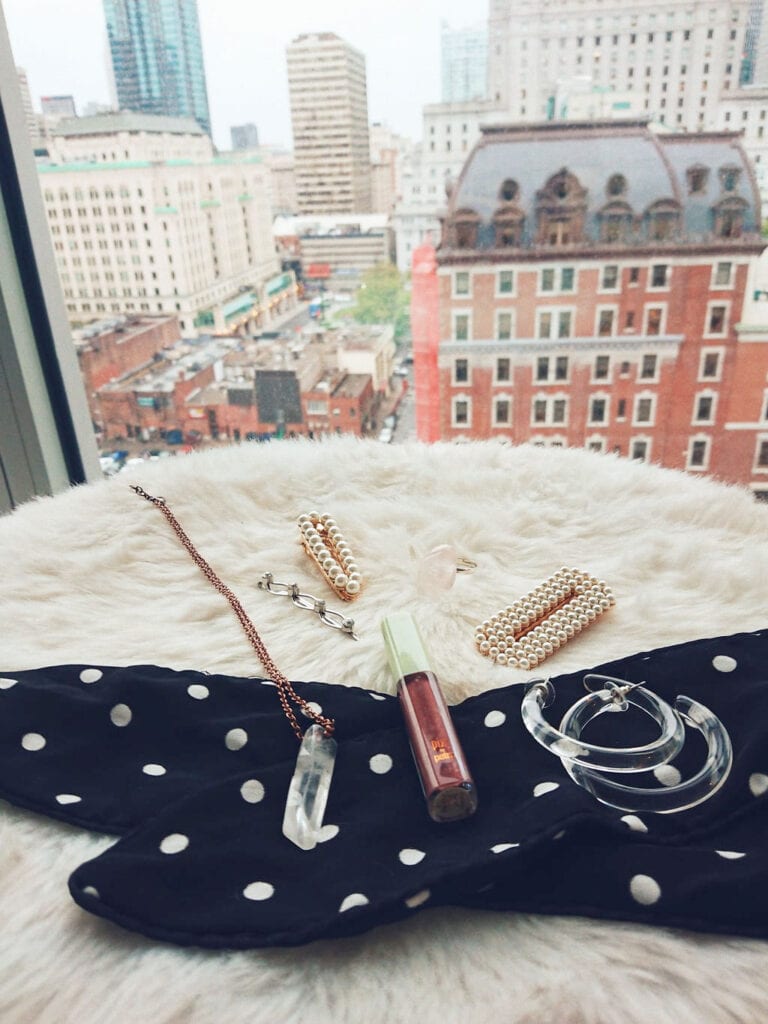
6. Focus on Getting the Angles
First and foremost, use a square template when you’re shooting. It’s easier to post if it’s already a square, and you won’t have to worry about cropping anything out. Plus, it will help with keeping the photo balanced.
Shooting a flatlay from above is a fabulous go-to, as you can see each item that way. However, don’t be afraid to get creative with your angles and switch it up from time to time.
Recently, I stayed at a hotel with a lovely view and took the photo below of a few accessories I brought – I ended up liking the photos I took with the view out of the window better than the ones taken from above! It’s a different take on a flatlay that’s unexpected and fun.
What did you think of our flatlay tips?
What do you think of these tips? Any important ones that I missed? Share below with links to your proudest flatlays – let’s inspire each other.
Love these tips! I typically suck at flatlays, but that’s also because I didn’t really know how to get the lighting right. Bookmarking this post so I can try these tips for a future one. I’m determined to get it right 🙂