I hate eyebrows. There, I said it! I hate how we are not born with perfect eyebrows, therefore, us girls must take time to precisely pluck them, brush them, and then fill them in. Thankfully, Sally Hansen has incredible eyebrow-perfecting tools that makes the job much easier and basically foolproof, even if you aren’t an eyebrow expert!
What I do to “fix” my eyebrows is pluck them using two different kinds of tweezers by Sally Hansen—one for stray hairs and one specifically for the arch. The arch tweezer is sharp and pointed, and the stray hair tweezer is slanted. Both products are available at Target.
In this tutorial, I will show you my “lazy girl” eyebrow method – it takes 5 minutes tops!
Table of Contents
What you need:

- 1. Sally Hansen Perfect The Arch Dual Slant and Point Tip Tweezer
- 2. Sally Hansen Brow Shaper
- 3. Sally Hansen Raise Some Brows Expert Slant Tip Tweezer
- Your favorite brown eyeshadow that matches your eyebrow color
- Concealer
- A slanted pencil eyeshadow brush
Step 1:
Clip back your bangs if you have them, or any loose hair just to keep it off your face! You don’t want anything messing with your brow symmetry.
Step 2:
Comb through your brows with the Sally Hansen Brow Shaper. Use the brush first, then take off the cap and use the comb to make sure they’re perfect.
Step 3:
This is going to sound weird, and I definitely look crazy in the picture below, but trust me it makes a huge difference. Take a slanted eyeshadow brush and dip it in some concealer and use it to outline your brows and the brow shape you want. Why concealer? It highlights your brow and also is easy to blend after you’re done so there’s no need for makeup remover.

Step 4:
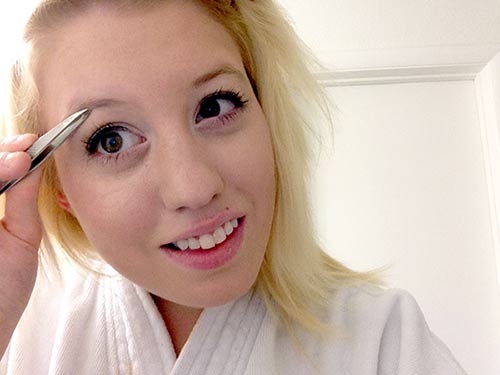
Take the Sally Hansen Raise Some Brows tweezer (the pink one) and begin plucking the “runaway” hairs, or the ones that fall outside your concealer outline or fall right on the concealer line. Keep the tweezers as close to the root of the hair as you possibly can to minimize pain.
Note: Do not use ice to numb your eyebrow area! It does not actually lessen the pain, and doing that actually makes your eyebrow hairs harder to pluck, causing more irritation.

Step 5:
Using the Sally Hansen Perfect the Arch tweezer (the silver one), begin literally perfecting your arch. Remove hairs that are outside of your arch, and never pluck hairs from the top of your eyebrows! Always pluck from below. Remember that too much is not always a good thing. (Sorry for cheesing very hard in these photographs. I just love eyebrows!) After that, blend the concealer in because you don’t need it anymore!
Step 6:
At this point, your brow area will probably be a little red. That’s okay! The pain goes away pretty quickly. Brush through your eyebrows and make sure everything looks good. Then, take your brown, light brown, or dark brown eyeshadow and the same slanted eyeshadow brush (make sure it’s free of concealer!) and with small, quick flicking motions, fill in your brows. I fill mine in from back to front so I don’t overdo the front of my brow.

Step 7:
Brush through your brows one last time, and voila! You’re done. If you see any loose hairs that are outside of your filled-in brow, tweeze them now! After that, your eyebrows should be looking fine!
Disclosure: This post was sponsored by Sally Hansen and the Sally Hansen products were provided for free. The opinions, as always, are our own. For more information, please see our Disclosure page.
The only thing you’re doing when you’re tweezing your eyebrows is irritating your skin and the more you do it, the less your eyebrow hairs will get. Follow the natural ways of your body, skip the tweezers.
I’m so tired of hearing this ridiculous “never pluck from above” rule. Sure, for most Caucasian eyebrows it’s a good rule of thumb, since they tend to sit in a lower place and have at least something of a natural shape. But that rule doesn’t apply to everyone. I’m half Chinese, and get my crazy sparse-puff-cloud eyebrows from that half of my family. If I only plucked from below, my eyebrows would either be really wide and unevenly dense or would be very sparse and halfway up my forehead. As a result, I always pluck from both above and below, and people always compliment me on my “perfect” eyebrows.
I wouldn’t say anything about eyebrows is a set-in-stone rule, as everyone’s are different.
I’m a little embarrassed that I’m 24 and I never heard of using concealer like that before now! Nice tutorial.
That brow shaper looks amazing! Awesome tutorial 🙂