
Metallics are extremely trendy right now — from metallic eye makeup to clothing to accessories, sparkling metal shades are very “in”. Painting the trend on your nails is an easy way to spice up your total look.
Our friends at Sally Hansen have an amazing new line of nail polishes that make it so easy for you to apply metallic colors to your nails without getting a look that’s too chunky or glittery. These polishes make your nails look like they’re coated in foil, in the best possible way. Also, they’re easy to find – all of the products mentioned below are available at Target!
In this tutorial, I’ll be showing you the easiest way to achieve a cool twist on the basic metallic mani that’s perfect for summer. This polish is so beautiful, so you can choose whether or not to add the coral stripe (or any other color), but if you do, I have some easy tricks to make it simple! Read on to see the finished product and my steps on how to achieve it.
Table of Contents
What you need:
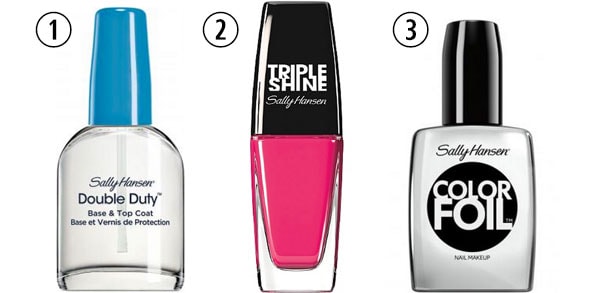
- Sally Hansen Double Duty 2-in-1 Base and Top Coat
- Sally Hansen Triple Shine in #210 Reef-Raf
- Sally Hansen Color Foil in #490 Sterling Silver
Step 1
File and buff your nails so that they’re smooth and ready for polishing! I have relatively short nails, but they’re still long enough that I need to file them, so I always make sure they look perfect before I polish. It just makes applying polish easier and less streaky!
Step 2
Finish prepping your nails by applying a base coat, like Sally Hansen Double Duty, and then you’re ready to apply your first coat of color!
Step 3
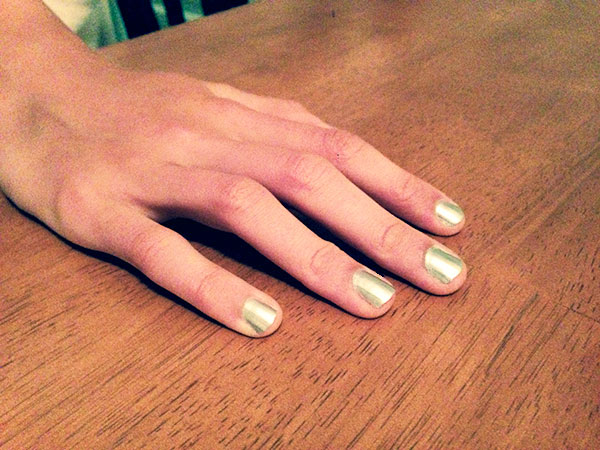
You’ll be using the Color Foil polish first, so apply a thin layer and let it completely dry. Then apply your second coat. I used two coats on my nails, although some people do need to use three, so use your discretion!
If you’re going to add the pink middle stripe (so cute!) then make sure you let this polish dry completely—which can sometimes mean letting your nails dry for an hour. Budget your time wisely! We will be using tape in the next step, so you don’t want your polish coming off on the tape.
Step 4
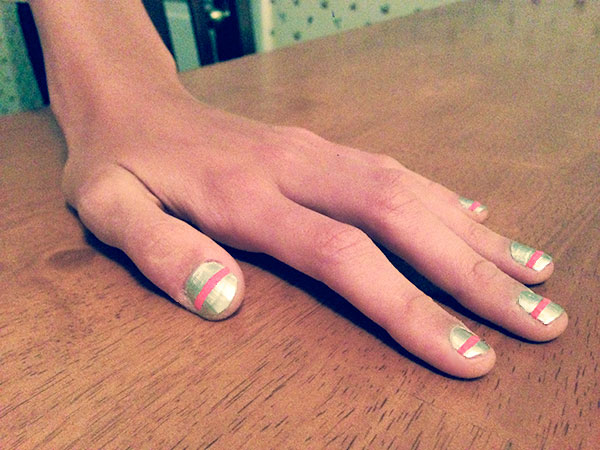
Now it’s time to apply the stripe! Here, the picture is a little misleading because the shine from the metallic plus the light in my kitchen causes the pink line to look a little chunky, but I promise it’s completely smooth. I’m a perfectionist, so I notice everything, and I had no issues with this manicure!
How to apply the stripe: Figure out where you want it on your nails. You will need two pieces of completely clear, thin Scotch (or other brand) tape. Make sure the tape is NOT the frosted finish tape. That kind is too thick to work well. Pre-cut 20 1-inch pieces of tape, and when you’re done, start applying them! Put one piece on the top of your nail and one on the bottom, leaving the amount in between the two the size that you want the stripe.
Then paint away! Make sure not to go too crazy, and apply a thin coat so that it won’t bleed through. This polish is very opaque, so you’ll have no problem with one coat. Let dry for 45 minutes or more, depending on your nails. You know your nails!
After they’re completely dry, slowly peel off the tape, and apply a top coat! I suggest Sally Hansen Double Duty 2-in-1 Base & Top Coat. And voila! You’re done!
This is the perfect, easy summer manicure. It looks fancy, but it’s really not too difficult as long as you have time to wait for the polish to dry. Have fun with this look!
Disclosure: This post was sponsored by Sally Hansen and the Sally Hansen products were provided for free. The opinions, as always, are our own. For more information, please see our Disclosure page.