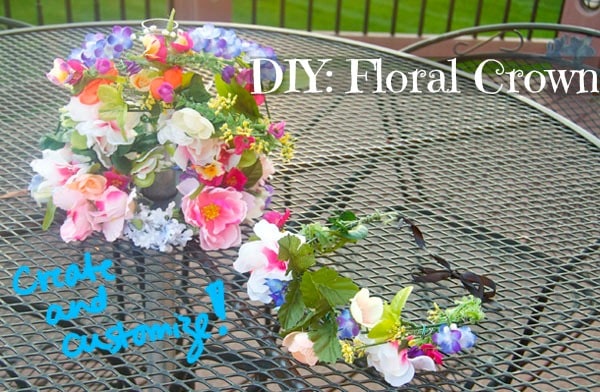
‘Tis the season for floral crowns. These on-trend accessories are the perfect choice for summer, whether you’re heading to a music festival or attending a summer wedding.
Today’s DIY tutorial will help you construct and customize your very own floral crown, so you can choose whether you want to make a statement or play it subtle with these charming accessories. Read on to learn how to construct one for yourself:
Table of Contents
What You’ll Need:
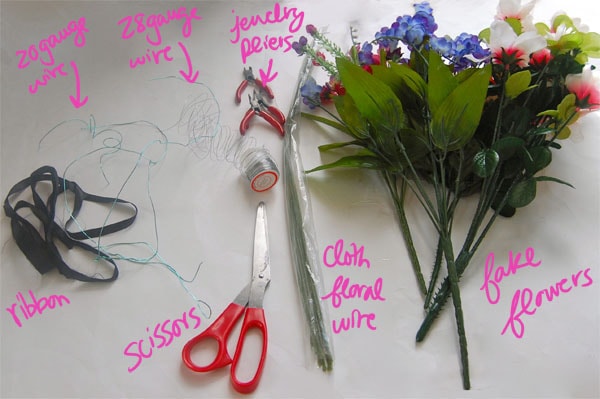
- Fake flowers (These can be purchased at craft stores like Jo-Anns or Michaels. Mine were on sale at 70% off, so I paid $0.89-$1.79 for each flower type)
- Green cloth floral wire (I used 18 gauge, but a 22 gauge works too)
- 28 gauge wire
- 20 gauge wire (preferably green)
- Jewelry pliers (wire-cutters, round-nose, flat-nose)
- Ribbon
- Scissors
- Optional: hot glue, clear nail polish, a lighter
Step One:
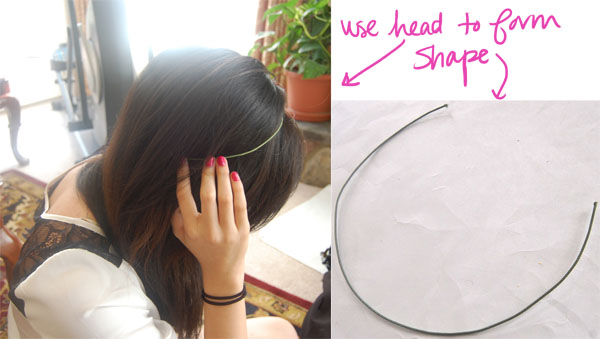
Form the base of the floral crown by wrapping and shaping the cloth floral wire around your head where you want the crown to sit. Don’t worry if the wire is too short, that’s what step two is for!
Step Two:
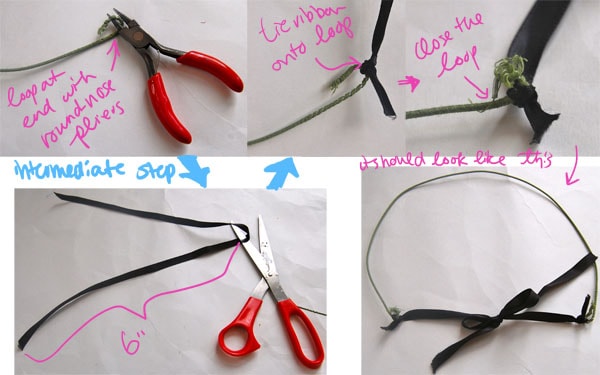
Make a small loop with the round nose pliers at the ends of the floral crown base. Cut a long length of ribbon, and chop it in half. (The lengths really depend on how much extra distance you need on the crown base.) Double knot each ribbon to the little wire loops; for extra security, use jewelry pliers to close this loop.
To make sure the ribbon edges don’t fray, either dab a little clear nail polish on the ends or slightly burn them with a lighter.
Step Three:
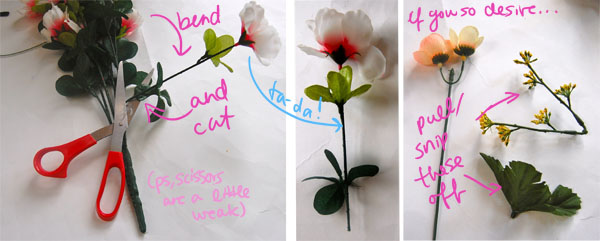
Disassemble your flowers. Bend each flower down from its main “stem” and cut it off (easiest done with wire cutters). If you want, tear off any leaves or extra flower parts you don’t want on your final piece. I decided to keep the leaves on my azalea, but removed extras from the blossom heather.
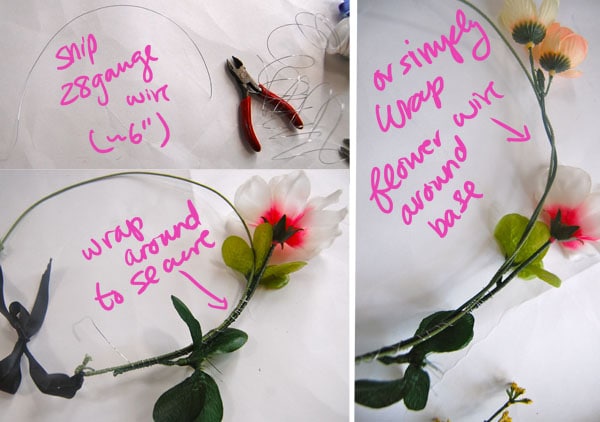
Step Four:
Now, attach your flowers! I used four different types, prom azalea (white), blossom heather (peach), mini wisteria (blue) and pansy grass (purple). There are two basic techniques to attaching the flowers:
The first technique (shown below) is to wrap the flower stems to the crown base. Snip a length of 28 gauge wire (approximately six inches), line up the flower stem to the crown base, and wrap the wire around both the crown base and flower stem to secure. If your flower stem is sturdy and flexible enough, you can simply wrap its stem around the crown base instead.
The second technique is for flowers and leaves that don’t have a stem and have a hole in their center. As shown below, cut a length of 20 gauge wire (approximately three inches) and insert it into the hole in the flower/leaf. Make a loop at the end, making sure the loop is wider than the hole. The wire loop should keep the wire stem in place. Pull the wire down all the way, and wrap this portion around the crown base.
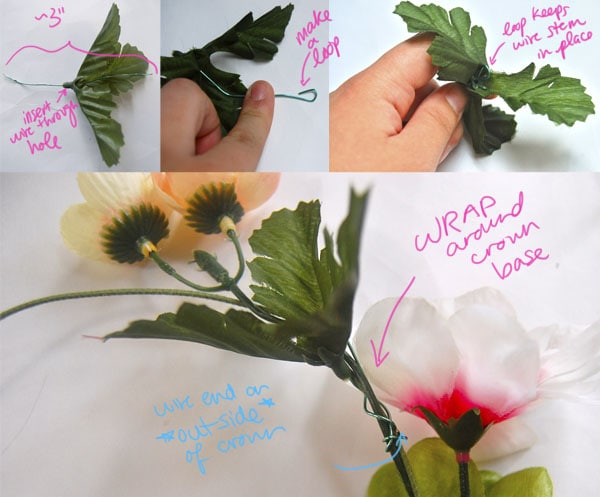
Pro-Tip: make sure to tuck all your wire ends on the outside of the crown base. I find that dabbing a little hot glue on the wire ends make sure the ends are blunt and won’t stab and poke your head.
Keep adding flowers to your hearts desire!
The Finished Product:
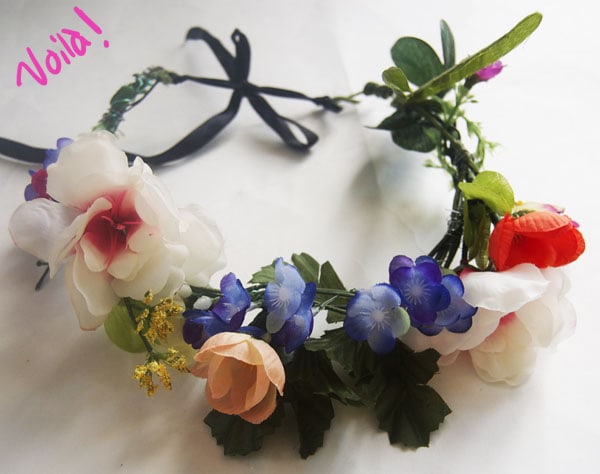
With the amount of flowers I bought, I actually managed to make 7 crowns, which are pictured below. (There’s 6 different styles, and an extra crown in the picture, as that was my “practice run”.) My total cost was a little under $10.
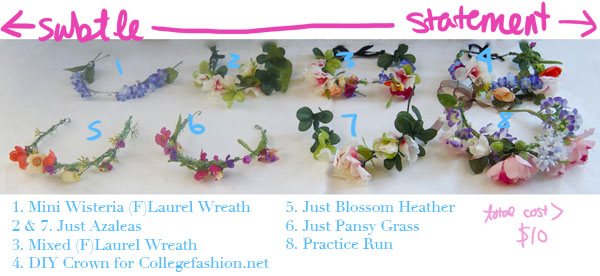
You can opt for a more subtle floral wreath or go bold and add tons of large flowers (see my floral crown continuum above for the variations). It’s really up to you!
How to wear your floral crown:

To wear, simply snuggly tie the ribbons in the back to secure. This statement-making accessory is sure to add a bohemian vibe to any look.
Feedback Please:
What do you think of this DIY project? Would you wear a floral crown? What other kind of DIY tutorials would you like to see? Let me know in the comments!