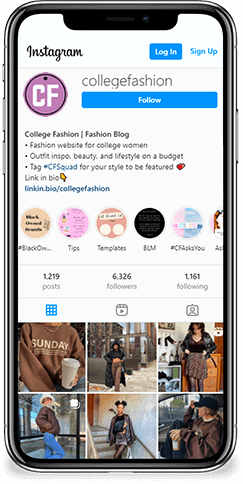
Follow College Fashion on Twitter!

DIY Chic: Button Stud Earrings Tutorial

21 Comments

Do-It-Yourself button earrings

Personal style on a college budget can be a challenge. Especially when the latest trends change with the seasons… literally. But with a little DIY magic, you can perk up your wardrobe without breaking the bank. That’s just what I aim to prove here – DIY Chic is dedicated to bringing you budget-friendly and super easy do-it-yourself projects.

For our first project, these adorable button stud earrings are about as simple as you can get. I love how they add a youthful and feminine touch to any look and it’s so easy to make them entirely your own. (For more on making jewelry, see our past tutorials on DIY beaded earrings and DIY decoupage earrings.)

Even better, this tutorial is a great way to re-purpose an old item. You know that old button-down shirt or cardigan in your closet – the one you never wear, the one that’s too big or has that unrepairable rip? Before you throw it out, salvage the buttons and take a look at this far-too-easy idea for a new pair of earrings!

What you’ll need:

  • Buttons
  • Earring posts and backs (available at craft stores)
  • Scissors
  • Hot glue gun
  • Felt (optional)

DIY button earring tutorial supplies

The step-by-step process:

1. Before you get started, be sure to plug in your hot glue gun and let it heat up. Also be sure to read through the manufacturer’s instructions before use.

2. Pick out your pair of buttons. Experiment with sizes and colors, or get creative with novelty or vintage buttons. Then, grab your earring posts and backs. I found the posts and backs at a craft store for less than $2 for a small bag.

DIY button earring tutorial steps

3. The next step is entirely optional, but does make it easier to fasten the buttons to the earring posts. Cut two small squares of felt, in a color that either matches or contrasts with your buttons. Add a small dab of glue and press the button onto the felt until dry. Then, trim away the extra felt.

4. Finally, add another dab of glue and secure the earring post to the back of the button. Of course, you’ll want to let the earrings dry and cool completely.

DIY button earrings final product

And there you go! A simple, quick, and inexpensive way to add a new pair of adorable earrings to your jewelry collection. I think this project would also make a great gift for a best friend, sister, or roommate.

What do you think?

What do you think of these simple DIY earrings? Would you consider making your own jewelry, or do you prefer to stick to store-bought accessories? Do you have an idea or suggestion for a future DIY project you’d like to see here on College Fashion? Let us know what you think in a comment!

Posted on on January 18, 2012 / Filed Under: Fashion Tips / Tags: , , , , ,

Blog Widget by LinkWithin

21 Responses to “DIY Chic: Button Stud Earrings Tutorial”

  1. 1
    January 18th, 2012 at 6:16 pm

    So cute! I will definitely have to try this!

  2. 2
    January 18th, 2012 at 6:25 pm

    I love this! It’s so cute, I will definitely have to try this! :) Great post!

  3. 3
    January 18th, 2012 at 7:03 pm

    These are so adorable! I love them and will definitely give it a try. The only thing is I feel like a pair of earrings from forever 21 are cheaper than the stuff required to make a pair of these unless your making them in bulk or something. Love them regardless.

  4. 4
    January 18th, 2012 at 7:32 pm

    Super cute!

  5. 5
    January 18th, 2012 at 7:47 pm

    I have been making button earrings along with other button jewelry (bracelets, necklaces, rings, hair barrettes) for years. Though I have never tried to put fabric beind the buttons but I like to use a needle-nose jewelry pliers and hold the earring post with that. Then I put a large-ish dollop of the hot glue on it before pressing the button on. The glue goes through the holes of the button giving it this cool bubble effect and it makes the earring look a lot cleaner.

  6. 6
    January 18th, 2012 at 8:07 pm

    Love this:)

  7. 7
    January 18th, 2012 at 8:41 pm

    So adorable! I’m definitely going to try this out :D I really love CF’s DIY posts.

  8. 8
    January 18th, 2012 at 8:51 pm

    This is a really cute idea!

  9. 9
    January 18th, 2012 at 8:54 pm

    Adorable and so easy!

  10. 10
    January 18th, 2012 at 9:08 pm

    Those earrings are the cutest things ever! I so wish I could wear them. Unfortunately, I’m allergic to all metals except gold. Maybe I will make these for friends and family and give as gifts. :)

  11. 11
    January 18th, 2012 at 9:39 pm

    Too bad I can’t wear earrings! I’m insanely allergic to metal.

  12. 12
    January 18th, 2012 at 9:59 pm

    Super cute! What a great idea! I actually have everything needed to make these somewhere aroun the house, Except the earring itself. These would also make such a cute, creative and inexpensive gift idea. Thanks!

  13. 13
    January 19th, 2012 at 10:37 pm

    Adorable!

  14. 14
    January 19th, 2012 at 10:41 pm

    ???? this..I’m going in the craft store tomorrow.. #super excited ^-^

  15. 15
    January 20th, 2012 at 3:15 pm

    Those are really adorable and I imagine they’d be even cuter in bright colors.

  16. 16
    May 1st, 2012 at 9:35 pm

    So cute! I kind of want to make some with googly eyes!

Links to This Article

Leave a Reply

Line

* Comment Rules: CF is a positive place and our comments section is no different. Constructive criticism is fine, but if you're rude, we'll delete your comment. Please use your PERSONAL name or initials and not your business name and do not put your website in the comment text, as both come off like spam. For more info, see our Comment Policy. Have fun & thanks for adding to the conversation!

Line


* Want a custom avatar to show up next to your comments? Sign up for a free Gravatar.