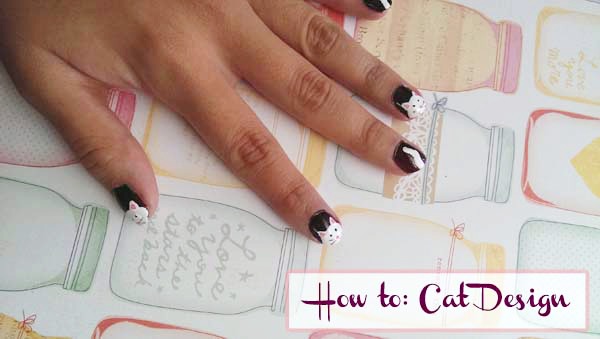
When I was coming up with this nail tutorial, I was a little torn. With the chill of autumn finally starting to set in, I wanted to incorporate a classic fall look, but wasn’t feeling much inspiration to go with it. And then, as my friend’s cat lazily yawned at me from the other side of the couch, it hit me; who doesn’t love cats?
I had a lot of fun coming up with this look, since I’m a bit of cat person. Okay, I’m sort of a future crazy cat lady, I’ll admit it! Using a great fall color and a light hand, you can have this adorable cat design on your nails, too! Scroll down to learn how to create this nail art:
Table of Contents
Fall Fun
Can I just say that fall is my absolute favorite season? With the changing colors of the leaves, that satisfying crunch as you step on their fallen brethren, and the ability to start layering once again, what’s not to love?
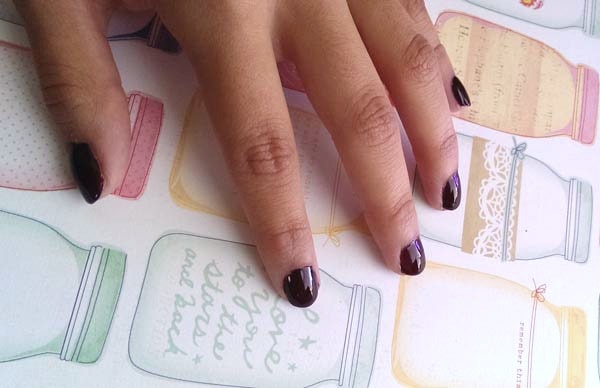
Dark, plummy colors are a must during fall, which is why I decided to use Sally Hansen’s Flirt as a gorgeous base color. It is beautifully pigmented, and captures that vampy fall look perfectly.
All You Need is Love… and a Cat
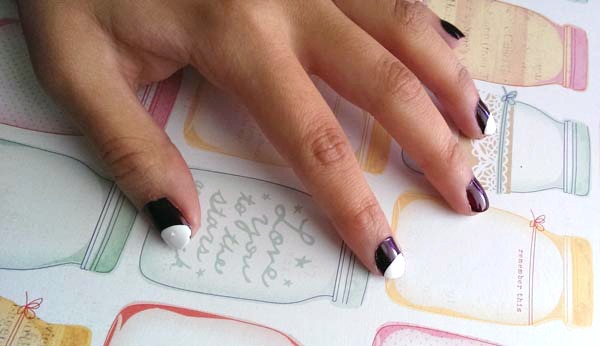
Alright, now to the best part; the kitty! To start, paint a half circle across the top of your nails. I decided to paint just my thumb, index, and ring finger, and used a rich white nail polish.
The trick to this tutorial? Patience! Make sure every coat has been given ample time to dry. That way, as we layer on the cat features, nothing underneath will get ruined. So, let these half circles dry completely before moving on.

Next, the cat ears! I’m using my handy dried out Sharpie pen as a dotting tool, but feel free to use a toothpick or a small bobby pin for this part.
Dip the tool into a pool of white nail polish (I placed mine on an index card), then dot on two small triangles. You can also drag on the outline of the triangle to get more precise lines, but I found that my nail polish was a bit too opaque for this. Once again, wait for the ears to dry completely.
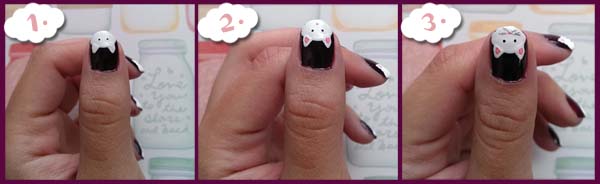
For this next step, it is important to use a very light hand to dot on all the features. Also, make sure you don’t have too much polish on your dotting tool. We want to avoid accidentally making large blobs on our cute kitty face!
Dip your tool into a small amount of black polish, then dot on the eyes. Use your ears as a guide so they don’t end up too wide set or too close together. I dotted mine on right where the inner part of the ear starts. Again, dot off any excess polish you may have on your dotting tool so the eyes don’t end up too big.
Next, using the Sally Hansen Nail Art Pen in Light Pink, I painted on thenose right below the center of the eyes. Then, make a single dot within each of the ears and add a tiny flick to create a small triangle.
Finally, using a silver polish, drag your dotting tool across the outer part of the nose to make little whiskers. I made two on each side, but feel free to add on more! Remember to only have a small amount of polish on your tool and make very light strokes to create a clean and precise look.

To switch up the look, I decided to paint little tails on my middle finger and pinky. For this part, you don’t need to be as precise as we were for the cat features, so feel free to have on a nice amount of nail polish on your dotting tool. I simply dotted a line close to the top of my nail before curving it slightly. Now your cat nail art is complete!
What Did You Think?
Are you a fan of cat designs? Would you wear this look for school? How do you feel about the cat craze that’s been taking over lately? Let us know in the comments below!