For the second article in my series about three-dimensional nail embellishments (in case you missed it, see the first one, DIY Nail Art: Loose Glitter), I’m going to to cover rhinestones.
One of the things I love about rhinestone nail art is that you can create so many different looks, from super-glamorous to girly to a little bit tough, depending on the size, color and shape of the stones. I know this may seem intimidating, but it’s easier than it looks!
There’s one thing I want to address before getting started: Yes, stick-on nail jewels that are made specifically for this purpose do exist, and may seem like they would be easier to use. However, there are several reasons why I recommend you use loose rhinestones bought from a fabric or craft store instead:
- First, you can get at least five times more jewels for a fraction of the cost. (I paid $2-3 per pack, as opposed to paying $5 for a small sheet of stick-ons from Sephora.)
- Second, there is a greater variety of loose rhinestones then there is of stick-ons made specifically for nail art. The options are endless!
- Third, I would argue that putting rhinestones on this way will give you a longer-lasting manicure than stick-ons will. Think about it: If they are made so you can pull them off a sheet of paper in order to stick them on, you can accidentally pull them off your nails just as easily.
Table of Contents
Rhinestone Manicure, Step by Step:
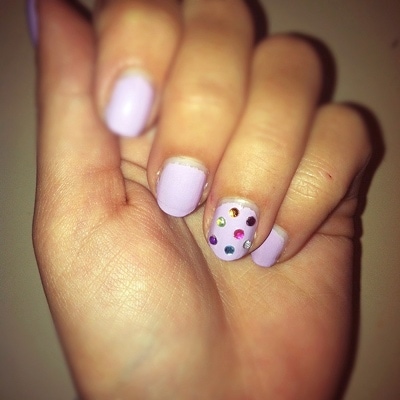
Let’s get started! Here’s everything you need to know to give yourself a rhinestone manicure like the one above.
What You Need:
- Base coat – I used Orly Bonder Rubberized Base Coat (both under the polish and to place the jewels on the nail).
- Nail polish
- Top coat – I used Sally Hansen Hard as Nails Top Coat.
- Some type of small stick – This could be an actual orange stick for manicures or it could be something as simple as a toothpick. Anything around that size should do the job.
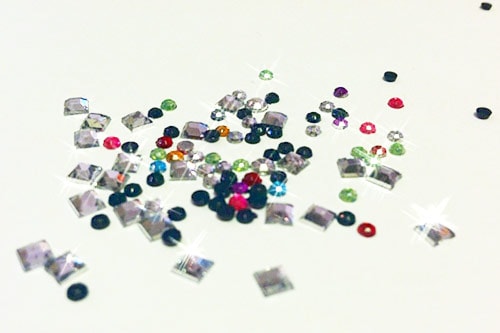
- Pack of jewels with flat backings – I got mine at a fabric store for $1-3/pack. I wanted a variety of different gems to make some cool designs, so I bought several packs, but one pack would be more than enough to cover your nails.
What To Do:
Before you begin, make sure that the rhinestones you’re using are set out, right-side up, on a flat surface. This will make them easier to pick up later. Now it’s time to bejewel your nails:
- Put on you base coat and nail polish as you normally would.
- After your polish has dried, take your stick and dab a bit of base coat on it, then use the part of the stick with the base coat on it to pick up a rhinestone from the top (i.e. the flat back should not be touching the stick, so that you can place it directly on the nail).
- Dab some base coat on the flat back of the rhinestone. You should be able to see that there is base coat on the backing, but don’t use a ton – if it looks like there’s a little bit much, you can use a finger to gently wipe some off.
- Place the rhinestone on your nail. Do this gently. You don’t want to dig the stone into the polish and risk messing it up.
- Repeat these steps until you’re happy with them!
Once you’ve finished, put on a generous amount of top coat to really seal the stones onto the nail. This step is really important! I actually tried doing two of my friends’ nails, one with top coat and one without, to compare the durability of the two manicures. The friend who had top coat on her nails didn’t lose a single stone until 4 days after I did them, even though she abused them with baking, writing and wearing gloves constantly. On the other hand (haha), my friend who didn’t have top coat started losing hers in a matter of hours. So if you want to ensure that your beautiful handiwork stays put, make sure you put a top coat on!
Some More Rhinestone Nail Design Ideas:
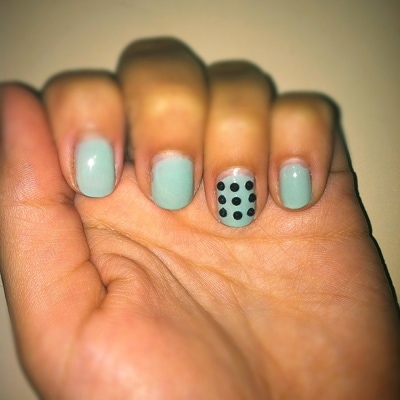
{Polish: Hey! Get in Lime! by OPI}
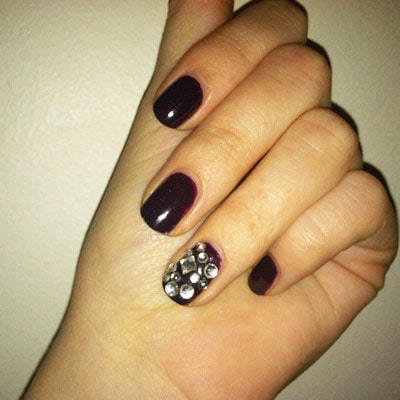
{Polish: Carry On by Essie}
I had a ton of fun trying out different designs on my friends! In the top picture I was going for a stud-inspired look, so I used black stones and made sure the rows were straight so the result was nice and uniform. The bottom look was actually inspired by this lovely tutorial from Honestly, WTF – I loved the use of differently-shaped gems, and this is how I translated it into nail art.
What Do You Think?
Now that you know how to do these nails, I want to hear your thoughts! Would you rock rhinestone nails? How would you wear them? Tell us in the comments section below, and be sure to let us know how the tutorial works for you if you try it!
This is so chic! Love the style of having rhinestones on just one finger, it looks different and outstanding of doing this nail art design.
This method is very interesting, thanks for the cognitive post.
HELP!!! So here is my problem, I used a gelly specifically for rhinestones to apply my jewels and embellishments and because I have larger embellishments I didn’t top coat since it would probably look really jacked up so this may be the problem. What’s happening is I cannot put my fingers anywhere near my hair without it pulling and snagging so bad; is this typical of larger embellishments? Any solution for this?
Thank you! I ended up buying jewels from Michaels yesterday, and they fell off (stick on jewels), but today, I found an entire palette at my local beauty supply store. Only $1.99 ! I’ll be trying your method today 🙂
When I apply topcoat to my clear rignstones it turns them white?!
It’s so pretty. i have to try it…
very simple and easy manicure, super love!
Love love love!!definitely gonna do this!!thanks!!:)
I love that you only put the rhinestones on one nail! I think that makes the look more grown-up.